此页面提供相机图像测试套件 (ITS) 下的测试的完整列表,它是 Android 兼容性测试套件 (CTS) 验证程序的一部分。 ITS 测试是功能测试,这意味着它们不测量图像质量,但所有宣传的相机功能都按预期工作。本文档让开发人员和测试人员了解各个测试的功能以及如何调试测试失败。
测试按场景分组如下:
- scene0 :捕获元数据、抖动、陀螺仪、振动
- 场景1 :曝光、感光度、EV补偿、YUV vs JPEG/RAW
- 场景2 :人脸检测
- 场景3 :边缘增强,镜头移动
- 场景4 :纵横比、裁剪、视野
- 场景5 :镜头阴影
- 场景6 :缩放
- sensor_fusion :相机/陀螺仪时序偏移
有关每个场景的描述,请参见各个部分。
场景0
Scene0 测试不需要特定的场景信息。但是,手机必须静止才能进行陀螺仪和振动测试。
test_burst_capture
验证整个捕获管道能否跟上全尺寸捕获的速度和 CPU 时间。
测试的 API:
Pass:捕获一连串全尺寸图像,并且相机足够快以避免超时。
test_capture_result_dump
测试从手动捕获返回的捕获结果,然后转储它。
测试的 API:
Pass:完成捕获并转储捕获结果。
test_gyro_bias
测试设备静止时陀螺是否有稳定的输出。数据绘制为 20 个数据点的平均值。
测试的 API:
通过:随着时间的推移,陀螺仪读数的增量小于 0.01。
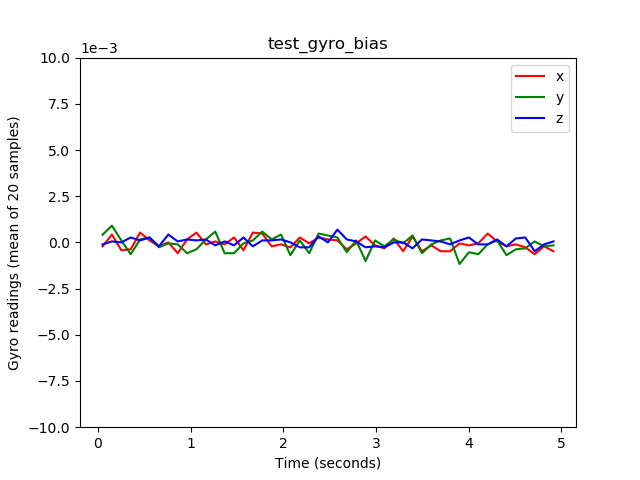
test_gyro_bias_plot.png
测试抖动
测量相机时间戳中的抖动。
测试的 API:
-
android.hardware.camera2.CaptureResult#SENSOR_TIMESTAMP -
android.hardware.camera2.CaptureRequest#CONTROL_AE_TARGET_FPS_RANGE
通过:帧之间至少有 30 毫秒的增量。
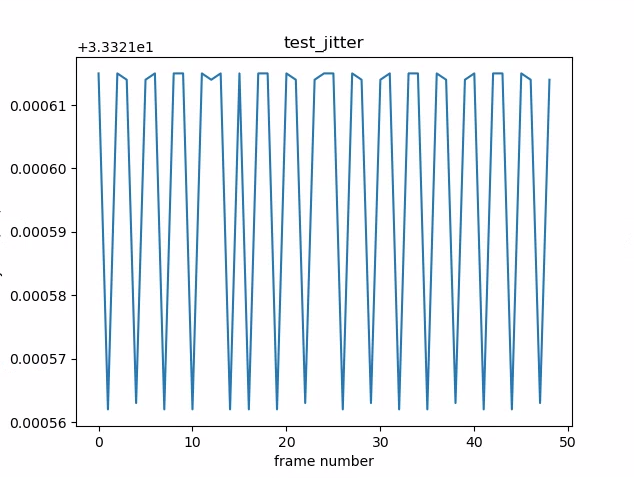
test_jitter_plot.png (注意小的 y 轴范围。在这个图中抖动实际上很小。)
测试元数据
测试元数据条目的有效性。查看捕获结果和相机特征对象。此测试使用auto_capture_request曝光和增益值,因为图像内容并不重要。
测试的 API:
-
android.hardware.camera2.CameraCharacteristics#INFO_SUPPORTED_HARDWARE_LEVEL -
android.hardware.camera2.CameraCharacteristics#SCALER_CROPPING_TYPE -
android.hardware.camera2.CameraCharacteristics#SENSOR_BLACK_LEVEL_PATTERN -
android.hardware.camera2.CameraCharacteristics#SENSOR_INFO_TIMESTAMP_SOURCE -
android.hardware.camera2.CaptureRequest#SENSOR_FRAME_DURATION -
android.hardware.camera2.CaptureResult#SENSOR_ROLLING_SHUTTER_SKEW
通过:硬件级别、 rollingShutterSkew 、 frameDuration标签、 timestampSource 、 croppingType 、 blackLevelPattern 、 pixel_pitch 、FOV、超焦距存在且具有有效值。
test_param_sensitivity_burst
测试android.sensor.sensitivity参数是否在突发中正确应用。仅检查输出元数据。
测试的 API:
-
android.hardware.camera2.CameraCharacteristics#SENSOR_INFO_SENSITIVITY_RANGE -
android.hardware.camera2.CaptureRequest#SENSOR_SENSITIVITY
通过:输出数据的误差容限小于 0.2%。
test_read_write
通过回读捕获元数据来测试设备是否写入了正确的曝光和增益值。
测试的 API:
-
android.hardware.camera2.CameraCharacteristics#SENSOR_INFO_EXPOSURE_TIME_RANGE -
android.hardware.camera2.CameraCharacteristics#SENSOR_INFO_SENSITIVITY_RANGE -
android.hardware.camera2.CaptureRequest#SENSOR_EXPOSURE_TIME -
android.hardware.camera2.CaptureRequest#SENSOR_SENSITIVITY -
android.hardware.camera2.CaptureResult#SENSOR_EXPOSURE_TIME -
android.hardware.camera2.CaptureResult#SENSOR_SENSITIVITY
通过:读取和写入值在所有镜头中匹配。
测试传感器事件
测试设备查询并打印出宣传传感器融合支持的设备的传感器事件。预期的传感器是加速度计、陀螺仪和磁力计。此测试仅在屏幕打开时有效,这意味着设备未处于待机模式。
测试的 API:
Pass:接收每个传感器的事件。
test_solid_color_test_pattern
测试是否为相机静音正确生成纯色测试图案。如果支持相机静音,则必须支持纯色测试图案。如果不支持相机静音,则仅在宣传该功能时才测试纯色测试图案。
如果支持 RAW 图像,还会测试颜色分配。测试的颜色是黑色、白色、红色、蓝色和绿色。对于不支持 RAW 图像的相机,仅测试黑色。
测试的 API:
-
android.hardware.camera2.CameraCharacteristic#SENSOR_AVAILABLE_TEST_PATTERN_MODES -
android.hardware.camera2.CaptureResult#SENSOR_TEST_PATTERN_DATA -
android.hardware.camera2.CaptureResult#SENSOR_TEST_PATTERN_MODE
通过:支持的实心测试图案是正确的颜色,并且图像中的差异很小。
test_test_pattern
测试android.sensor.testPatternMode参数以捕获每个有效测试模式的帧,并检查是否为纯色和彩条正确生成了帧。该测试包括以下步骤:
- 为所有支持的测试模式捕获图像。
- 对纯色测试图案和彩条执行简单的正确性检查。
测试的 API:
-
android.hardware.camera2.CameraCharacteristic#SENSOR_AVAILABLE_TEST_PATTERN_MODES -
android.hardware.camera2.CaptureResult#SENSOR_TEST_PATTERN_MODE
Pass:正确生成支持的测试模式。
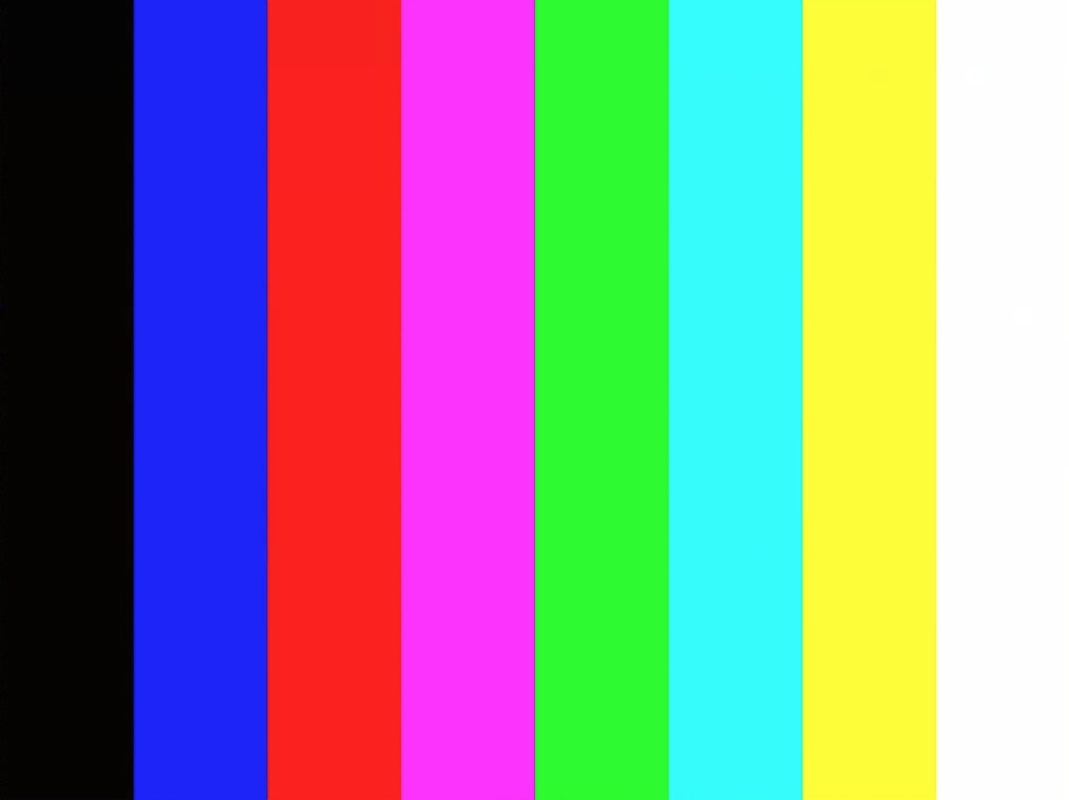
test_test_patterns_2.jpg
test_tonemap_curve
使用线性色调贴图测试测试模式从 RAW 到 YUV 的转换。该测试需要android.sensor.testPatternMode = 2 (COLOR_BARS) 来生成完美的图像模式以进行色调映射转换。确保管道具有正确的颜色输出和线性色调图和理想的图像输入(依赖于test_test_patterns )。
测试的 API:
-
android.hardware.camera2.CaptureRequest#DISTORTION_CORRECTION_MODE -
android.hardware.camera2.CaptureRequest#SENSOR_TEST_PATTERN_MODE -
android.hardware.camera2.CaptureRequest#TONEMAP_CURVE -
android.hardware.camera2.CaptureRequest#TONEMAP_MODE
Pass: YUV 和 RAW 看起来很相似。
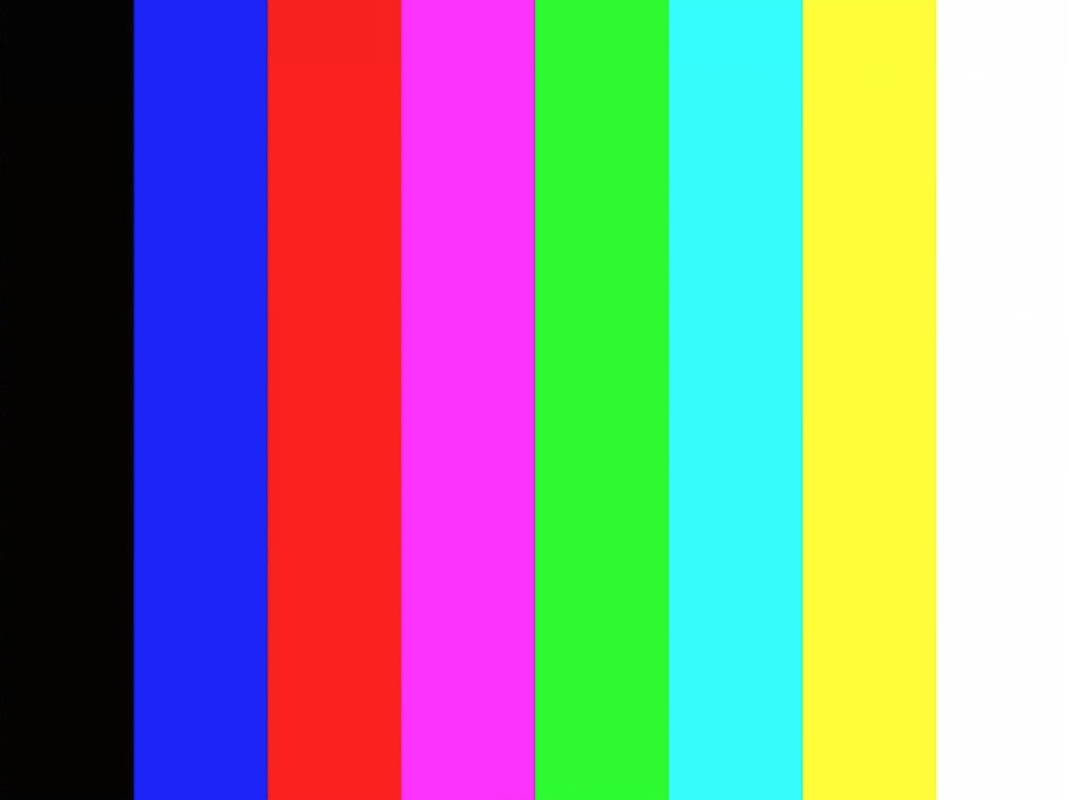
test_tonemap_curve_raw_2.jpg
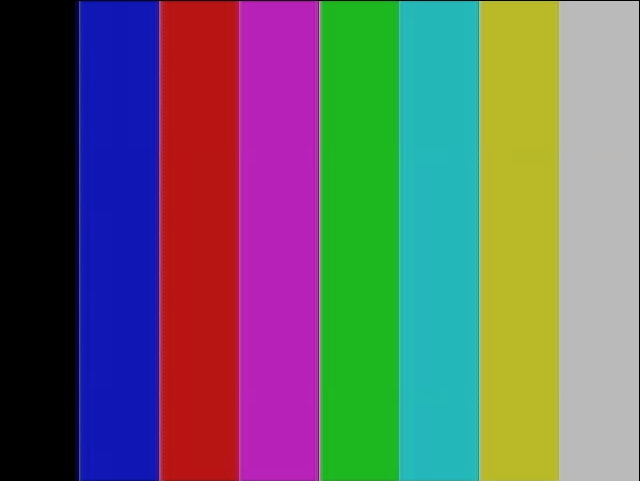
test_tonemap_curve_yuv_2.jpg
test_unified_timestamp
测试图像和运动传感器事件是否在同一时域中。
测试的 API:
-
android.hardware.camera2.CaptureResult#SENSOR_TIMESTAMP -
android.hardware.Sensor -
android.hardware.SensorEvent -
android.hardware.Sensor#TYPE_ACCELEROMETER -
android.hardware.Sensor#TYPE_GYROSCOPE
Pass:运动时间戳在两个图像时间戳之间。
test_vibration_restriction
测试设备的振动是否按预期运行。
测试的 API:
-
android.hardware.Sensor -
android.hardware.SensorEvent -
android.hardware.Sensor#TYPE_ACCELEROMETER -
android.os.Vibrator -
android.hardware.camera2.CameraDevice#setCameraAudioRestriction
通过:设备在被相机音频限制 API 静音时不振动。
场景1
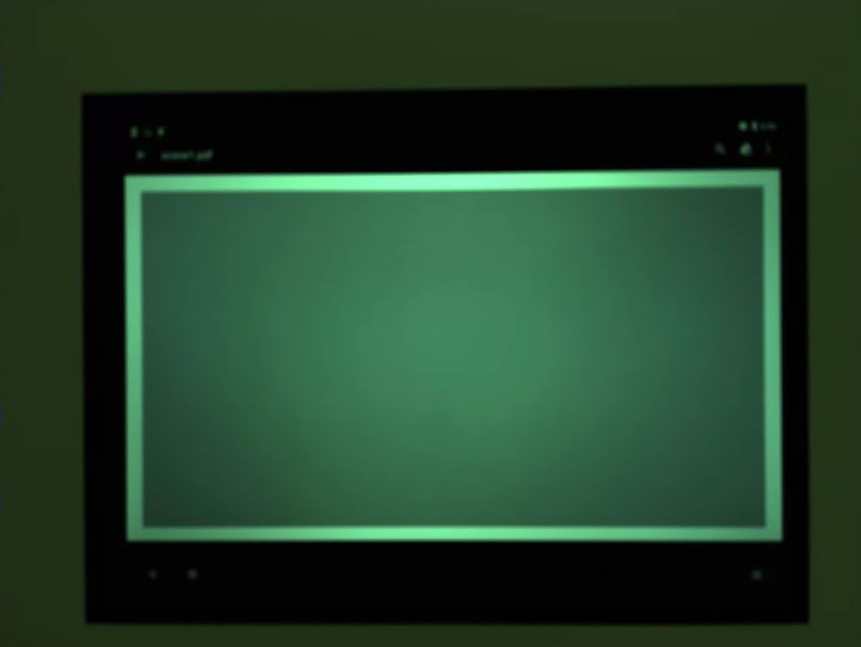
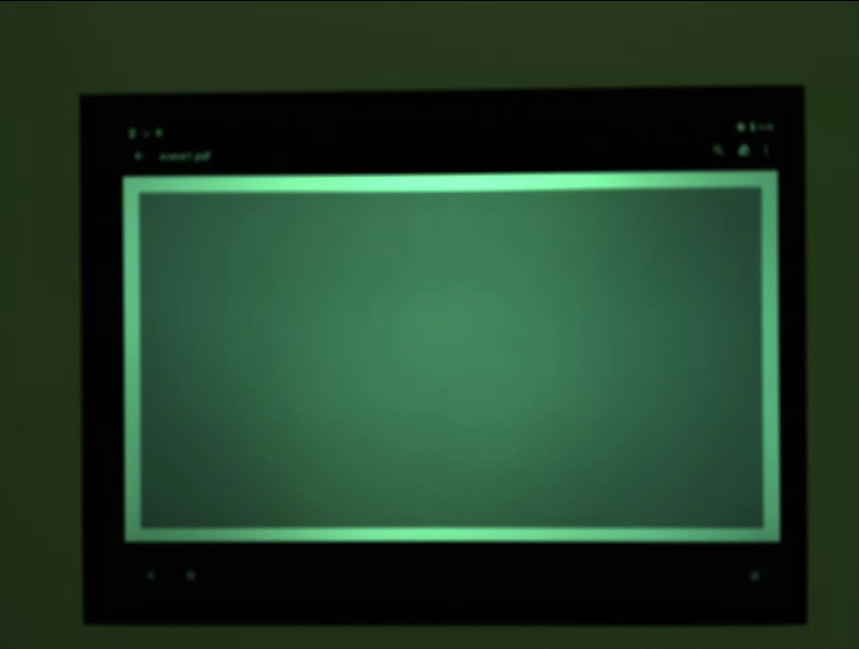
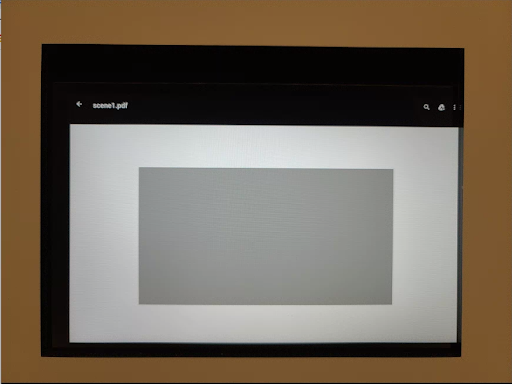
scene1 是一个灰色图表。灰色图表必须覆盖相机视野的中心 30%。由于中心区域没有特征,灰图有望适度挑战3A(自动曝光、自动白平衡、自动对焦)。但是,捕获请求指定了整个场景,其中包括足以使 3A 收敛的特征。
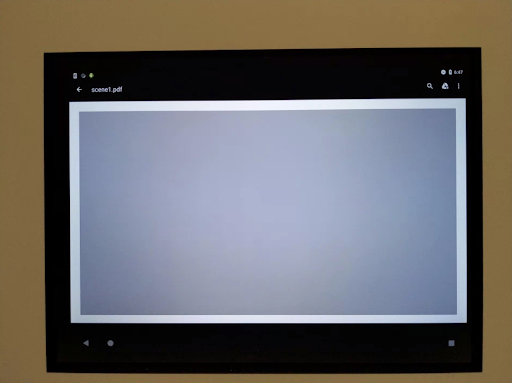
RFoV 摄像机可以在 WFoV 或 RFoV 测试台中进行测试。如果在 WFoV 测试台中测试 RFoV 相机,图表将按 ⅔ 缩放,以确保 FoV 中的灰色图表有一些边界,以帮助 3A 收敛。

场景1:全尺寸图表(左)。 ⅔ 比例图表(右)。
测试_3a
测试具有中等挑战性目标的 3A 的收敛性。
测试的 API:
-
android.hardware.camera2.CaptureRequest#CONTROL_AE_MODE -
android.hardware.camera2.CaptureRequest#CONTROL_AF_MODE -
android.hardware.camera2.CaptureRequest#CONTROL_AWB_MODE
Pass: 3A收敛,返回的3A值有效。
test_ae_af
分别测试 3A 自动曝光 (AE) 和自动对焦 (AF) 算法。
测试的 API:
-
android.hardware.camera2.CaptureRequest#CONTROL_AE_MODE -
android.hardware.camera2.CaptureRequest#CONTROL_AF_MODE -
android.hardware.camera2.CaptureRequest#CONTROL_AWB_MODE
Pass: 3A收敛,返回的3A值合法。
test_ae_precapture_trigger
使用预捕获触发器时测试 AE 状态机。在禁用 AE 的情况下捕获五个手动请求。最后一个请求有一个 AE 预捕获触发器,应该忽略它,因为 AE 已禁用。
测试的 API:
-
android.hardware.camera2.CaptureRequest#CONTROL_AE_MODE -
android.hardware.camera2.CaptureRequest#CONTROL_AE_PRECAPTURE_TRIGGER -
android.hardware.camera2.CaptureResult#CONTROL_AE_STATE
通过: AE 收敛。
test_auto_vs_manual
捕捉自动和手动镜头的测试看起来是一样的。
测试的 API:
-
android.hardware.camera2.CaptureRequest#COLOR_CORRECTION_GAINS -
android.hardware.camera2.CaptureRequest#COLOR_CORRECTION_TRANSFORM -
android.hardware.camera2.CaptureResult#TONEMAP_CURVE -
android.hardware.camera2.CaptureResult#TONEMAP_MODE
通过:每次捕获结果中报告的手动白平衡增益和转换与相机 3A 算法的自动白平衡estimate相匹配。
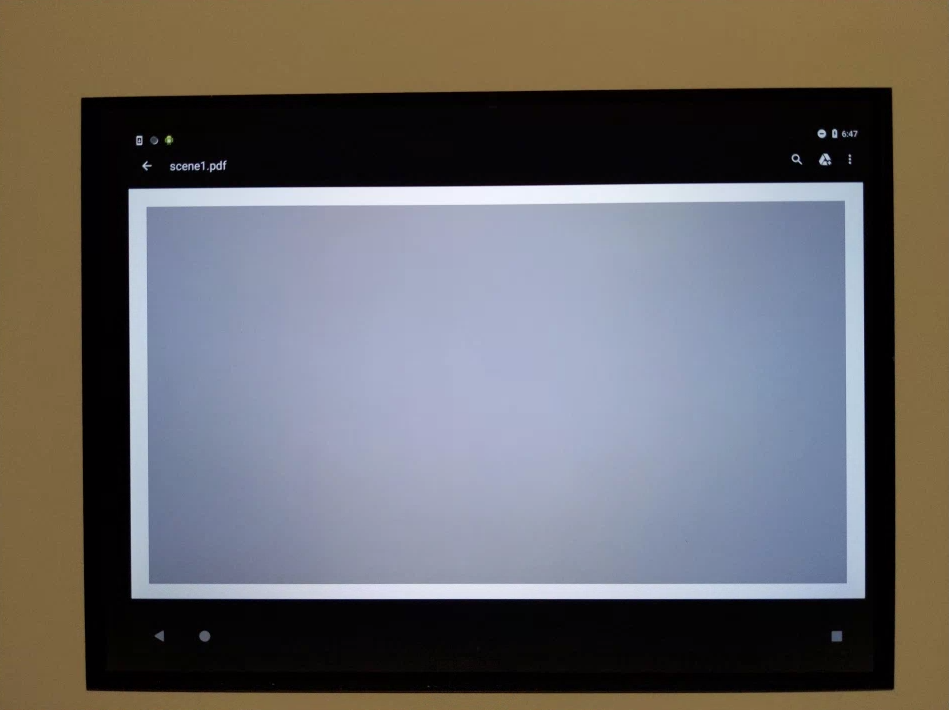
test_auto_vs_manual_auto.jpg
test_auto_vs_manual_wb.jpg
test_auto_vs_manual_manual_wb_tm.jpg
test_black_white
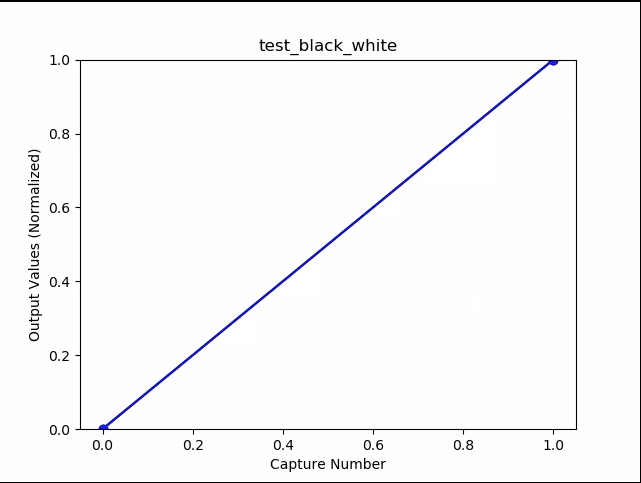
测试设备是否产生全黑白图像。进行两次拍摄,第一次以极低的增益和短曝光拍摄一张黑色照片,第二张以极高的增益和长时间曝光拍摄一张白色照片。
测试的 API:
-
android.hardware.camera2.CaptureRequest#SENSOR_EXPOSURE_TIME -
android.hardware.camera2.CaptureRequest#SENSOR_SENSITIVITY
Pass:产生黑白图像。
 |  | |
| test_black_white_black.jpg | test_black_white_white.jpg |
test_black_white_plot_means.png
test_burst_sameness_manual
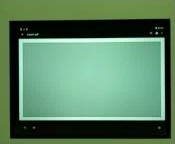
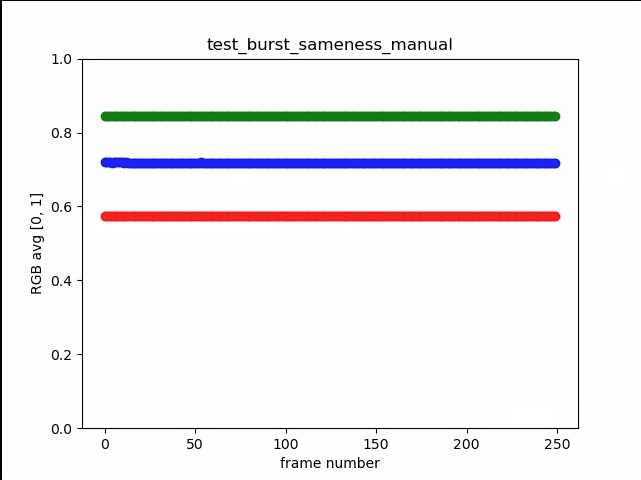
使用手动捕获设置拍摄 5 张 50 张图像,并检查它们是否完全相同。此测试可用于识别是否存在处理方式不同或具有伪影的零星帧。
测试的 API:
-
android.hardware.camera2.CameraMetadata#REQUEST_AVAILABLE_CAPABILITIES_MANUAL_SENSOR -
android.hardware.camera2.CameraMetadata#SYNC_MAX_LATENCY_PER_FRAME_CONTROL
通过:图像在视觉上和 RGB 值上相同。
失败:在每个突发开始时显示 RGB 平均图表的峰值或下降
first_API_level< 30 的容差为 3%-
first_API_level>= 30 的容差为 2%
test_burst_sameness_manual_mean.jpg
test_burst_sameness_manual_plot_means.png
test_capture_result
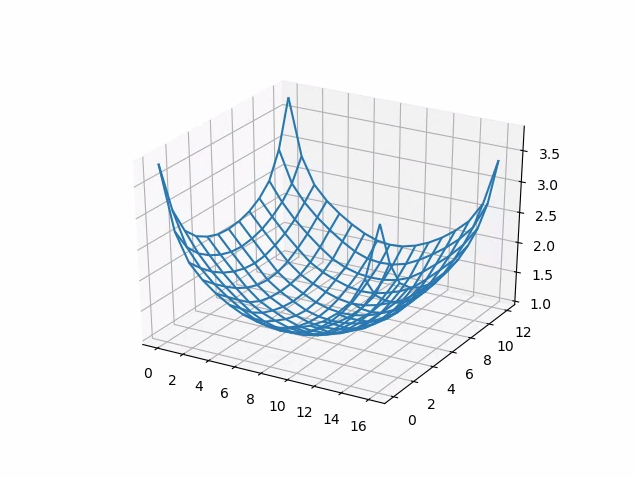
测试有效数据是否返回CaptureResult对象。进行自动、手动和自动捕获。
测试的 API:
-
android.hardware.camera2.CaptureRequest#CONTROL_AE_MODE -
android.hardware.camera2.CaptureRequest#CONTROL_AE_REGIONS -
android.hardware.camera2.CaptureRequest#CONTROL_AF_MODE -
android.hardware.camera2.CaptureRequest#CONTROL_AF_REGIONS -
android.hardware.camera2.CaptureRequest#CONTROL_AWB_MODE -
android.hardware.camera2.CaptureRequest#CONTROL_AWB_REGIONS -
android.hardware.camera2.CaptureRequest#CONTROL_MODE -
android.hardware.camera2.CaptureRequest#COLOR_CORRECTION_GAINS -
android.hardware.camera2.CaptureRequest#COLOR_CORRECTION_TRANSFORM -
android.hardware.camera2.CaptureRequest#COLOR_CORRECTION_MODE -
android.hardware.camera2.CaptureRequest#SENSOR_EXPOSURE_TIME -
android.hardware.camera2.CaptureRequest#SENSOR_SENSITIVITY -
android.hardware.camera2.CaptureResult#STATISTICS_LENS_SHADING_CORRECTION_MAP -
android.hardware.camera2.CaptureRequest#STATISTICS_LENS_SHADING_MAP_MODE -
android.hardware.camera2.CaptureRequest#TONEMAP_CURVE -
android.hardware.camera2.CaptureRequest#TONEMAP_MODE
通过:元数据对所有捕获都有效,并且手动设置不会泄漏到第二次自动捕获中。绘制捕获的镜头阴影校正。
test_capture_result_plot_lsc_auto_ch0.png
test_channel_saturation
测试 RGB 通道均匀饱和以消除图像饱和区域中的着色。
测试的 API:
-
android.hardware.camera2.CameraCharacteristics#SENSOR_INFO_EXPOSURE_TIME_RANGE -
android.hardware.camera2.CameraCharacteristics#SENSOR_INFO_SENSITIVITY_RANGE -
android.hardware.camera2.CaptureRequest#SENSOR_EXPOSURE_TIME -
android.hardware.camera2.CaptureRequest#SENSOR_SENSITIVITY
Pass:饱和通道的 RGB 值为 [255, 255, 255],误差幅度小于 1%。

test_channel_saturation.jpg
test_crop_region_raw
测试 RAW 流不可裁剪。
测试的 API:
-
android.hardware.camera2.CameraCharacteristics#SENSOR_INFO_ACTIVE_ARRAY_SIZE -
android.hardware.camera2.CaptureResult#SCALER_CROP_REGION -
android.hardware.camera2.CaptureRequest#SCALER_CROP_REGION
Pass: YUV 图像被中心裁剪,但不是 RAW 图像。
test_crop_region_raw_comp_raw_crop.jpg
test_crop_region_raw_comp_raw_full.jpg

test_crop_region_raw_comp_yuv_crop.jpg
test_crop_region_raw_yuv_full.jpg
test_crop_regions
测试作物区域是否有效。拍摄完整图像并创建 5 个不同区域(角和中心)的补丁。拍摄为 5 个区域设置裁剪的图像。比较补丁和裁剪图像值。
测试的 API:
-
android.hardware.camera2.CameraCharacteristics#SENSOR_INFO_ACTIVE_ARRAY_SIZE -
android.hardware.camera2.CaptureRequest#SCALER_CROP_REGION
Pass:裁剪区域的图像与裁剪图像对应的补丁匹配。
test_dng_noise_model
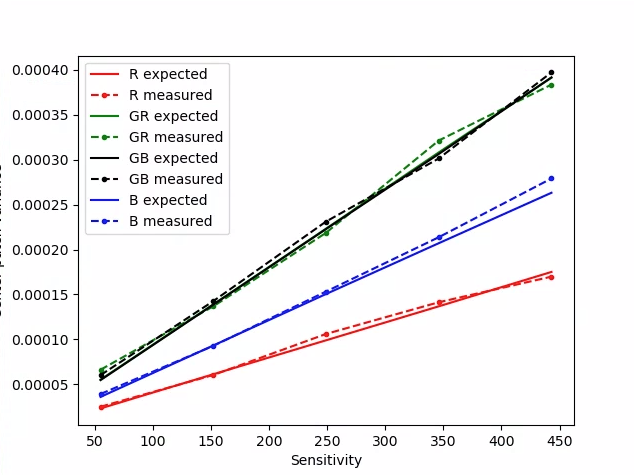
验证 DNG 原始模型参数是否正确。该图描绘了在一系列灵敏度范围内捕获的原始照片中灰卡中心补丁的测量方差,并将这些值与相机 HAL 中的 DNG 噪声模型在每个灵敏度下预期的方差(基于捕获结果对象中返回的 O,S 参数)。有关 DNG 噪声模型的更多详细信息,请下载有关DNG噪声模型的以下文档。
测试的 API:
-
android.hardware.camera2.CameraCharacteristics#SENSOR_INFO_SENSITIVITY_RANGE -
android.hardware.camera2.CameraCharacteristics#SENSOR_INFO_WHITE_LEVEL -
android.hardware.camera2.CameraCharacteristics#SENSOR_MAX_ANALOG_SENSITIVITY -
android.hardware.camera2.CaptureResult#SENSOR_NOISE_PROFILE -
android.hardware.camera2.CaptureRequest#SENSOR_SENSITIVITY
通过: DNG 原始模型参数正确。预期的 RGB 值与测量的实际 RGB 值相匹配。
test_dng_noise_model_plog.png
test_ev_compensation_advanced
测试是否应用了曝光值 (EV) 补偿。该测试分八步增加曝光,并检查测量的亮度与预期的亮度。预期值是根据未应用 EV 补偿的图像的图像亮度计算的,如果计算值超出实际图像值范围,则预期值将饱和。如果预期值和测量值不匹配或图像在五个步骤内曝光过度,则测试失败。
测试的 API:
通过:图像显示曝光增加,但在五个步骤内没有过度曝光。
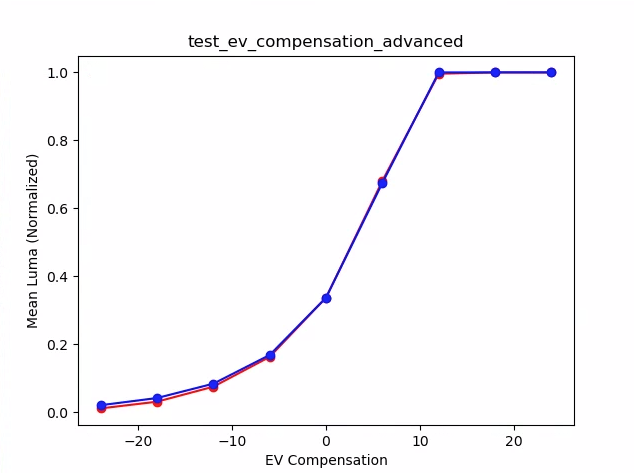
test_ev_compensation_advanced_plot_means.png
test_ev_compensation_basic
使用CONTROL_AE_COMPENSATION_STEP创建的范围测试是否应用了 EV 补偿。在每个补偿值处捕获八帧。
测试的 API:
-
android.hardware.camera2.CameraCharacteristics#CONTROL_AE_COMPENSATION_STEP -
android.hardware.camera2.CaptureRequest#CONTROL_AE_EXPOSURE_COMPENSATION -
android.hardware.camera2.CaptureRequest#CONTROL_AE_LOCK -
android.hardware.camera2.CaptureResult#CONTROL_AE_EXPOSURE_COMPENSATION -
android.hardware.camera2.CaptureResult#CONTROL_AE_STATE
通过:随着 EV 补偿设置的增加,捕获的亮度增加,并且为每个 EV 补偿设置捕获的八帧具有稳定的亮度值。
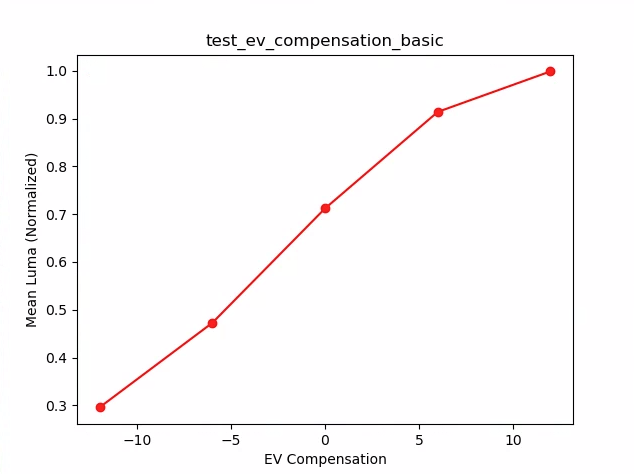
test_ev_compensation_basic.png
测试曝光
测试随着 ISO 和曝光时间的变化实现恒定曝光。拍摄一系列照片,选择 ISO 和曝光时间以相互平衡。结果应该具有相同的亮度,但在序列上图像应该变得更嘈杂。验证样本像素平均值彼此接近。确保图像没有被限制为 0 或 1(这会使它们看起来像平线)。通过在配置文件中设置debug标志,也可以使用 RAW 图像运行测试。
测试的 API:
-
android.hardware.camera2.CaptureRequest#SENSOR_EXPOSURE_TIME -
android.hardware.camera2.CaptureRequest#SENSOR_SENSITIVITY
通过:图像具有相同的亮度,但 ISO 越高噪点越多。当ISO*exposure的值在测试的增益空间内恒定时,RGB 平面是平坦的。
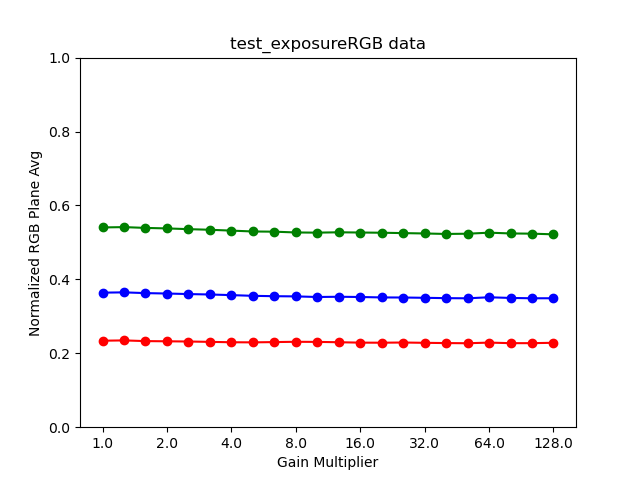
test_exposure_plot_means.png
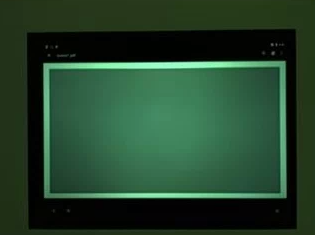 |  | |
| test_exposure_mult=1.00.jpg | test_exposure_mult=64.00.jpg |
test_jpeg
转换 YUV 图像和设备 JPEG 图像的测试看起来相同。测试取图像的中心 10% 并计算 RGB 值,并验证它们是否匹配。
测试的 API:
通过:每张图像之间的平均 RGB 差异小于 3%。
 |  | |
| test_jpeg_fmt=jpg.jpg | test_jpeg=fmt=yuv.jpg |
test_latch
测试设置(曝光和增益)锁定在FULL和LEVEL_3相机的正确帧上。使用背靠背请求拍摄一系列镜头,在镜头之间改变捕获请求参数。检查图像是否具有预期的属性。
测试的 API:
通过:图像 [2, 3, 6, 8, 10, 12, 13] 增加了 ISO 或曝光,并在test_latching_plot_means.png上显示出更高的 RGB 平均值。
 |  |  | |
| test_latching_i=00.jpg | test_latching_i=01.jpg | test_latching_i=02.jpg | |
 |  |  | |
| test_latching_i=03.jpg | test_latching_i=04.jpg | test_latching_i=05.jpg | |
 |  |  | |
| test_latching_i=06.jpg | test_latching_i=07.jpg | test_latching_i=08.jpg | |
 |  |  | |
| test_latching_i=09.jpg | test_latching_i=10.jpg | test_latching_i=11.jpg | |
 | |||
| test_latching_i=12.jpg |
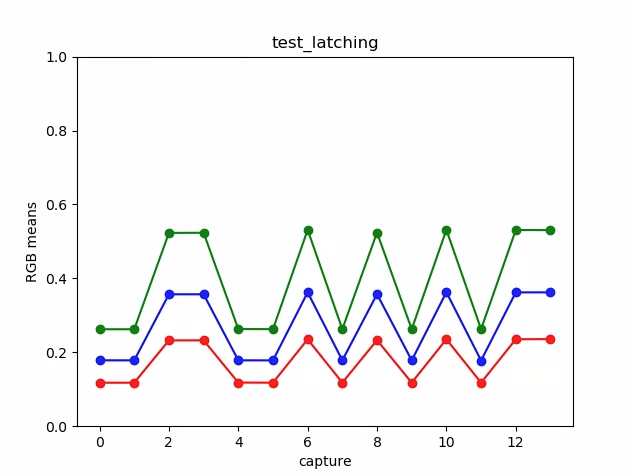
test_latching_plot_means.png
test_linearity
测试设备处理可以反转为线性像素。使用指向统一目标的设备捕获一系列射击。
测试的 API:
-
android.hardware.camera2.CameraCharacteristics#SENSOR_INFO_SENSITIVITY_RANGE -
android.hardware.camera2.CaptureRequest#BLACK_LEVEL_LOCK -
android.hardware.camera2.CaptureRequest#SENSOR_SENSITIVITY -
android.hardware.camera2.CaptureRequest#TONEMAP_CURVE -
android.hardware.camera2.CaptureRequest#TONEMAP_MODE
通过: R、G、B 值必须随着灵敏度的增加而线性增加。
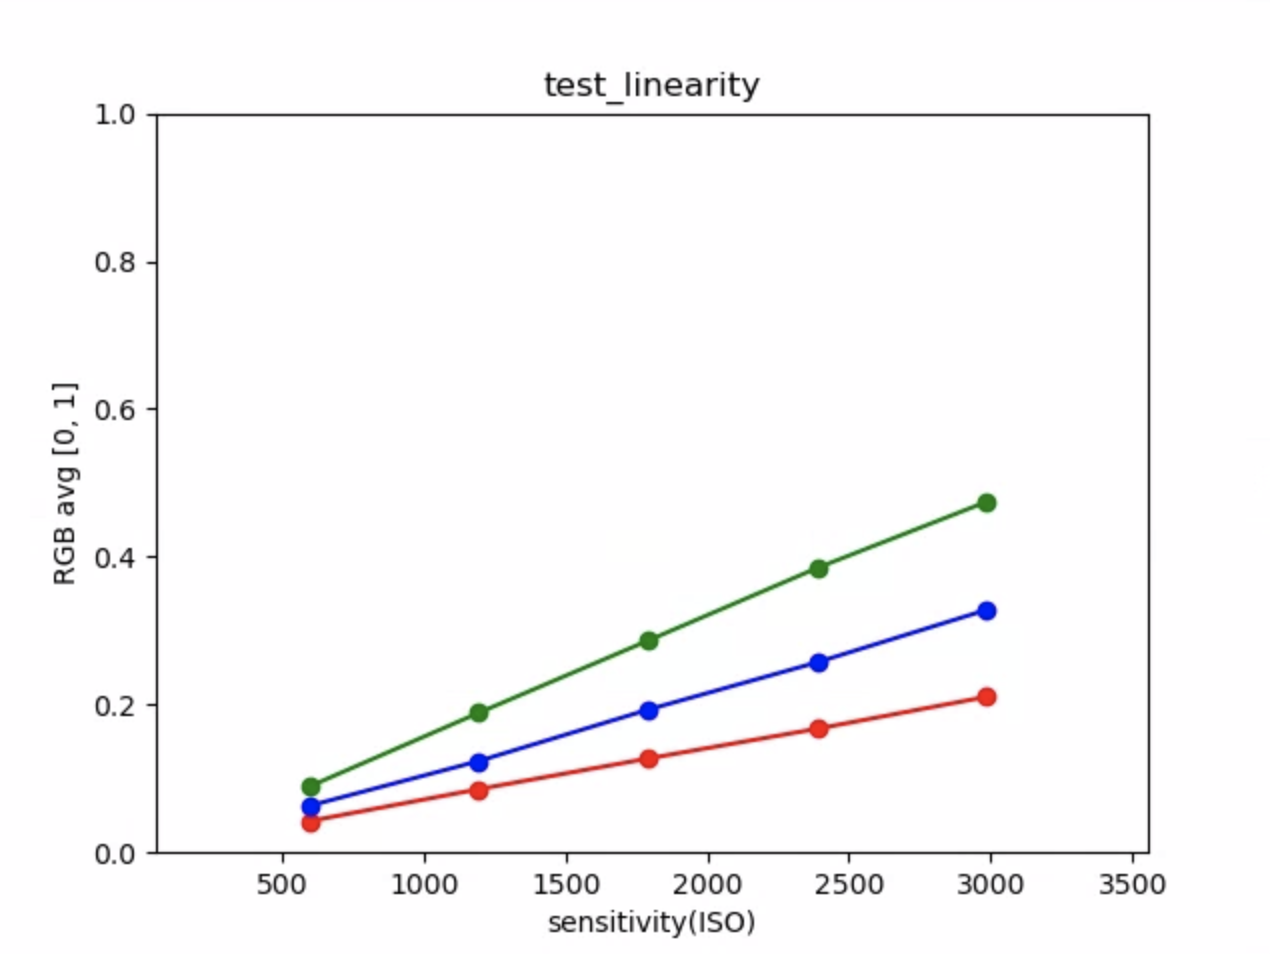
test_linearity_plot_means.png
test_locked_burst
测试 3A 锁定和 YUV 突发(使用自动设置)。此测试旨在通过即使在没有MANUAL_SENSOR或PER_FRAME_CONTROLS的有限设备上。测试检查 YUV 图像一致性,而帧率检查在 CTS 中。
测试的 API:
-
android.hardware.camera2.CaptureRequest#CONTROL_AE_LOCK -
android.hardware.camera2.CaptureRequest#CONTROL_AWB_LOCK
通过:捕获看起来一致。
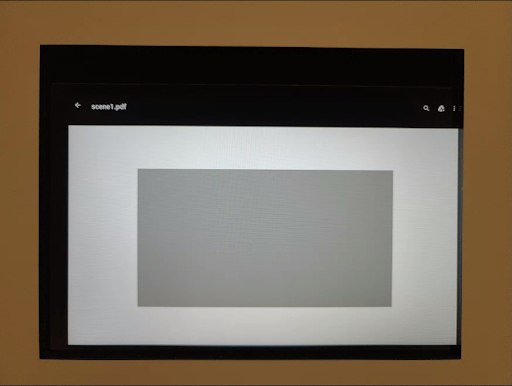
test_locked_burst_frame0.jpg
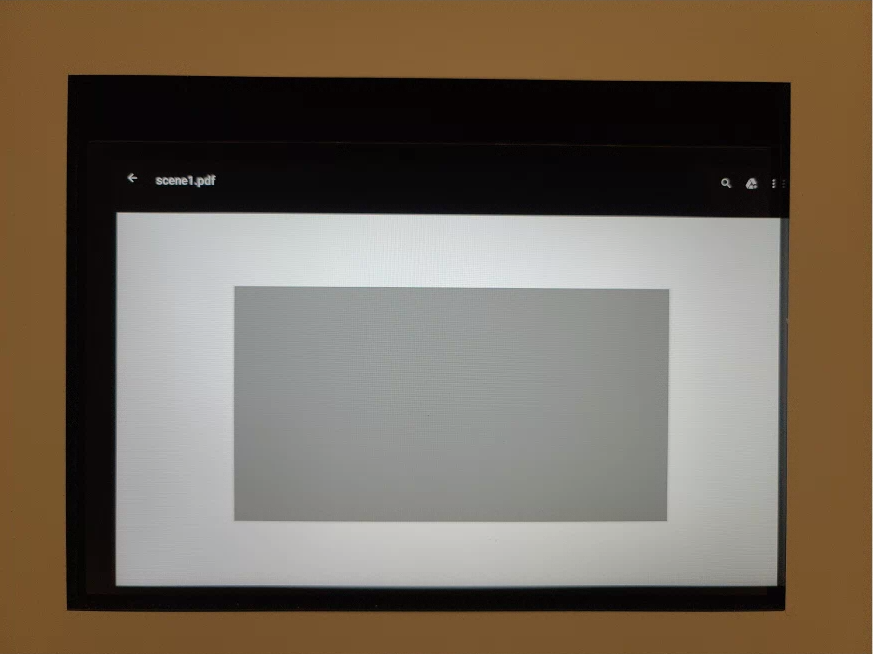
test_locked_burst_frame1.jpg
test_locked_burst_frame2.jpg
test_multi_camera_match
测试设备上的多台摄像机是否为灰色补丁提供了相似的 RGB 值。
测试的 API:
-
android.hardware.camera2.CameraCharacteristics#getPhysicalCameraIds() -
android.hardware.camera2.CameraCharacteristics#LENS_INFO_AVAILABLE_FOCAL_LENGTHS -
android.hardware.camera2.CameraMetadata#REQUEST_AVAILABLE_CAPABILITIES_LOGICAL_MULTI_CAMERA -
android.hardware.camera2.CaptureRequest#LENS_FOCAL_LENGTH
Pass:不同的相机为相同的灰度补丁产生相似的 RGB 值。
test_multi_camera+match_yuv_fl=4.38.jpg
test_param_color_correction
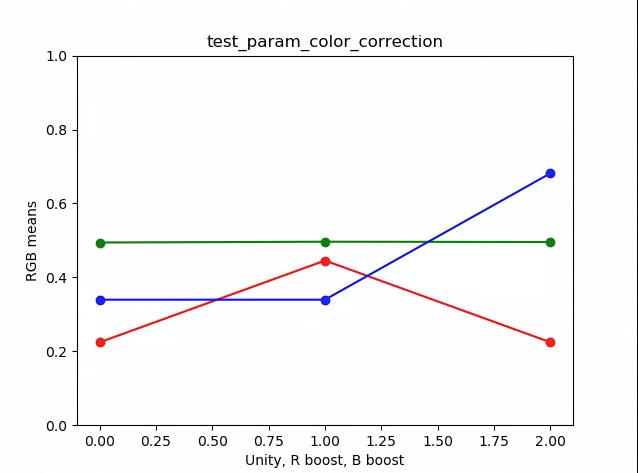
测试设置时应用android.colorCorrection.*参数。使用不同的变换和增益值进行拍摄,并测试它们看起来是否相应不同。选择变换和增益以使输出越来越红或越来越蓝。使用线性色调贴图。色调映射是图像处理中使用的一种技术,用于将一组颜色映射到另一组颜色,以在动态范围更有限的介质中近似高动态范围图像的外观。
测试的 API:
-
android.hardware.camera2.CaptureRequest#COLOR_CORRECTION_GAINS -
android.hardware.camera2.CaptureRequest#COLOR_CORRECTION_MODE -
android.hardware.camera2.CaptureRequest#COLOR_CORRECTION_TRANSFORM
通过: R 和 B 值根据变换提升。
test_param_color_correction_plot_means.png
*x 轴是捕获请求:0 = 统一,1=红色增强,2= 蓝色增强
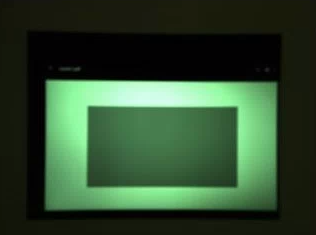
test_param_color_correction_req=0.jpg
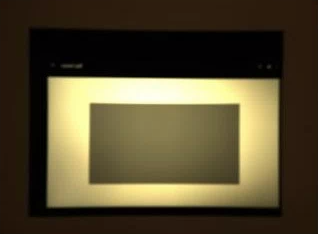
test_param_color_correctness_req=1.jpg (R 提升)
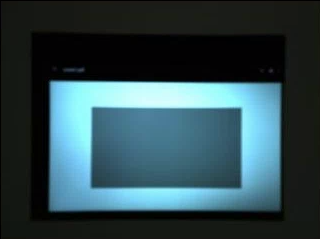
test_param_color_correction_req=2.jpg(B 提升)
test_param_exposure_time
测试应用了android.sensor.exposureTime参数。
测试的 API:
Pass:每一个镜头都比前一个镜头亮。
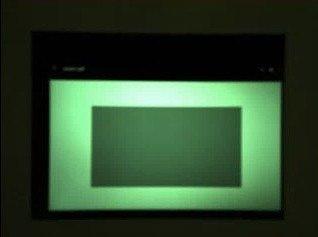
test_param_exposure_time_frame0.jpg
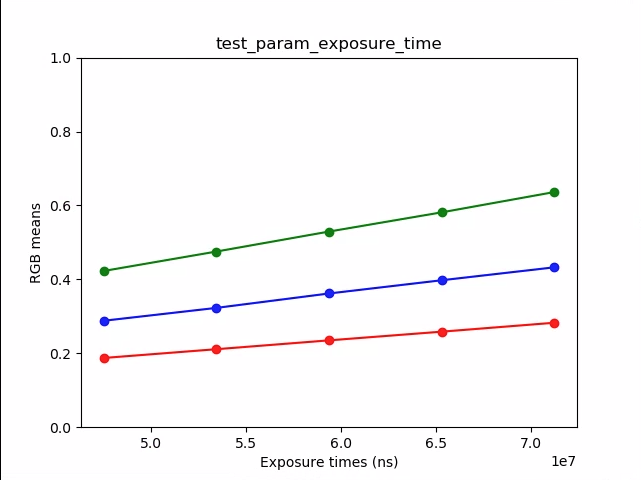
test_param_exposure_time_plot.png
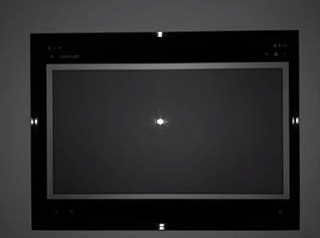
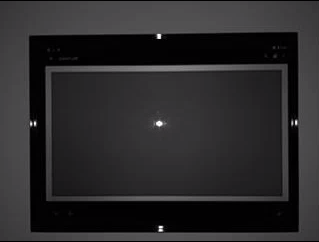
test_param_flash_mode
测试应用了android.flash.mode参数。手动将曝光设置在暗侧,以便闪光灯是否闪光一目了然,并使用线性色调贴图。检查平铺图像的中心,以查看是否创建了一个大渐变来验证闪光灯是否触发。
测试的 API:
Pass:平铺图像的中心有一个大的渐变,意味着闪光灯发射了。
test_param_flash_mode_1.jpg

test_param_flash_mode_1_tile.jpg
test_param_flash_mode_2.jpg

test_param_flash_mode_2_tile.jpg
test_param_noise_reduction
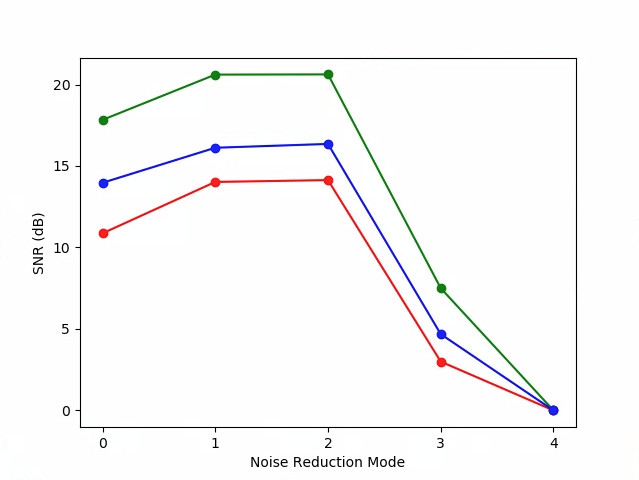
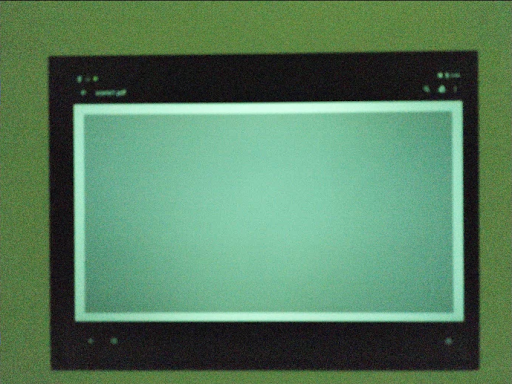
测试android.noiseReduction.mode参数在设置时是否正确应用。在相机光线昏暗的情况下拍摄图像。使用高模拟增益来确保捕获的图像有噪声。捕获三个图像,用于 NR 关闭、“快速”和“高质量”。还捕获具有低增益和 NR 关闭的图像,并将其方差用作基线。 SNR(信噪比)越高,图像质量越好。
测试的 API:
Pass: SNR 随降噪模式的不同而变化,表现类似下图。
test_param_noise_reduction_plot_SNRs.png
0:关闭,1:快速,2:HQ,3:MIN,4:ZSL
test_param_noise_reduction_high_gain_nr=0.jpg
test_param_noise_reduction_high_gain_nr=1.jpg
test_param_noise_reduction_high_gain_nr=2.jpg
test_param_noise_reduction_high_gain_nr=3.jpg
test_param_noise_reduction_low_gain.jpg
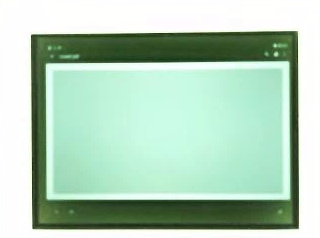
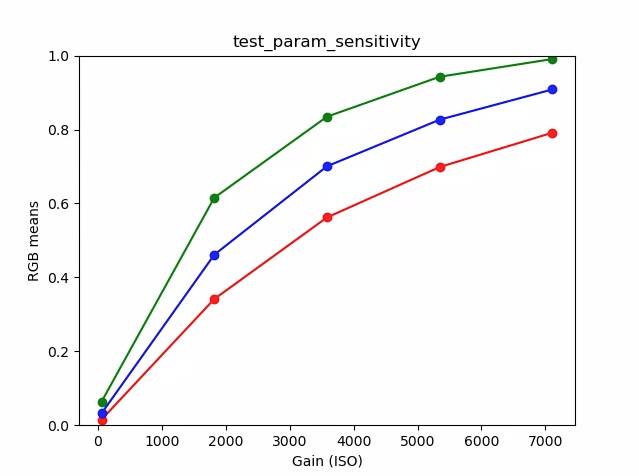
test_param_sensitivity
测试应用了android.sensor.sensitivity参数。该测试以 5 个步骤提高灵敏度,每次拍摄固定曝光。
测试的 API:
通过:中心 10% 的 RGB 表示随着灵敏度的提高而变亮。
test_param_sensitivity_iso=0055.jpg
test_param_sensitive_iso=1819.jpg
test_param_sensitive_iso=3583.jpg
test_param_sensitive_iso=5347.jpg
test_param_sensitive_iso=7111.jpg
test_param_sensitivity_plot.png
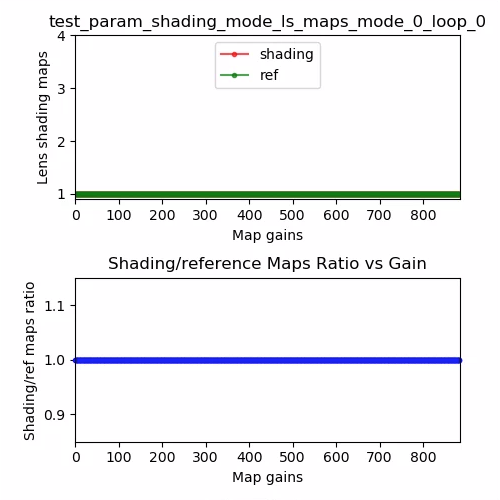
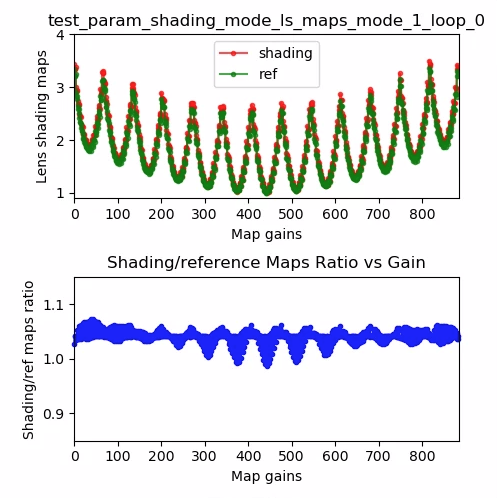
test_param_shading_mode
测试应用了android.shading.mode参数。
测试的 API:
-
android.hardware.camera2.CaptureRequest#SHADING_MODE -
android.hardware.camera2.CaptureRequest#STATISTICS_LENS_SHADING_MAP_MODE -
android.hardware.camera2.CaptureResult#STATISTICS_LENS_SHADING_CORRECTION_MAP
Pass:切换着色模式并按预期修改镜头着色图。
test_param_shading_mode_ls_maps_mode_0_loop_0.png
test_param_shading_mode_ls_maps_mode_1_loop_0.png
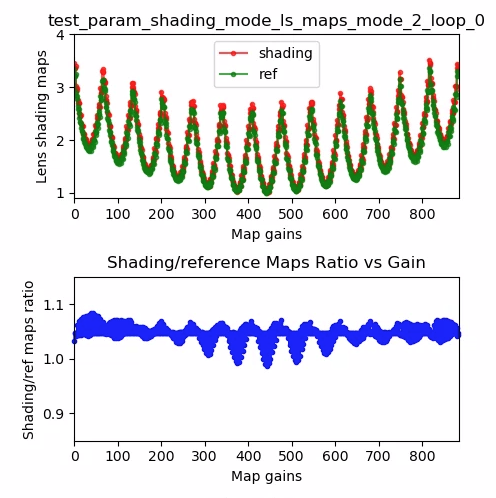
test_param_shading_mode_ls_maps_mode_2_loop_0.png
test_param_tonemap_mode
测试应用了 android.tonemap.mode 参数。将不同的色调映射曲线应用于每个 R、G、B 通道,并检查输出图像是否按预期进行了修改。该测试由两个测试组成,test1 和 test2。
测试的 API:
-
android.hardware.camera2.CaptureRequest#TONEMAP_CURVE -
android.hardware.camera2.CaptureRequest#TONEMAP_MODE
经过:
- test1:两个图像都有一个线性色调图,但 n=1 有一个更陡峭的梯度。对于 n=1 图像,G(绿色)通道更亮。
- test2:相同的色调图,但长度不同。图像是一样的。
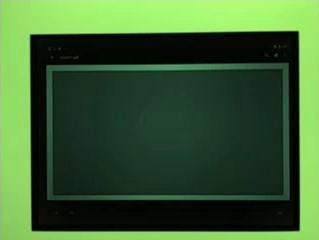 | 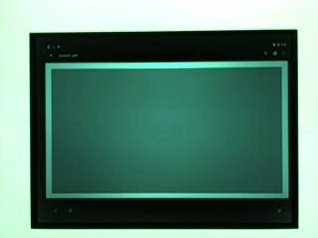 | |
| test_param_tonemap_mode_n=0.jpg | test_param_tonemap_mode_n=1.jpg |
test_post_raw_sensitivity_boost
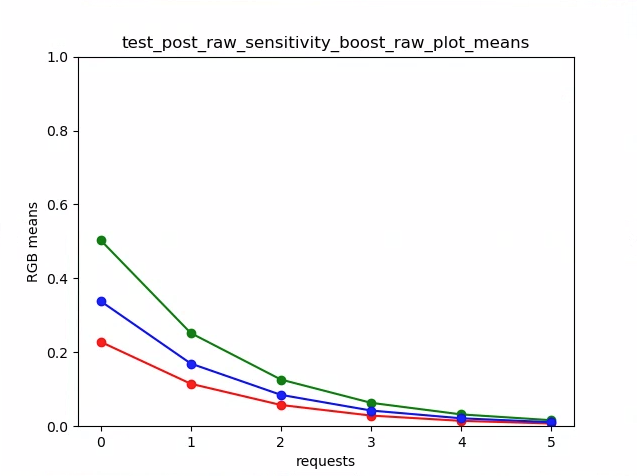
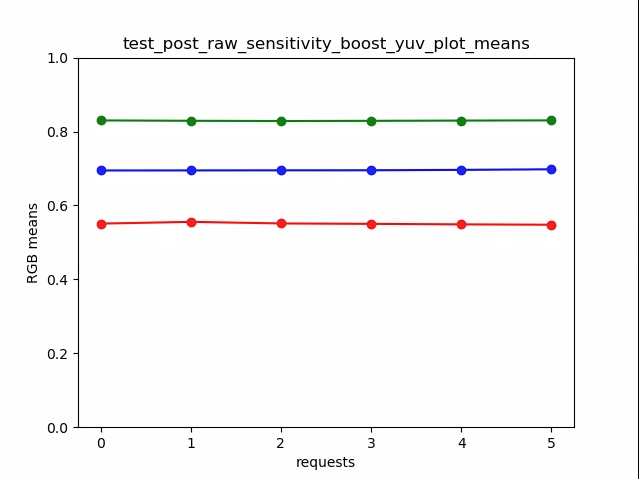
检查后 RAW 灵敏度提升。捕获一组具有不同灵敏度的 RAW 和 YUV 图像,发布 RAW 灵敏度提升组合并检查输出像素平均值是否与请求设置匹配。
测试的 API:
-
android.hardware.camera2.CameraCharacteristics#CONTROL_POST_RAW_SENSITIVITY_BOOST_RANGE -
android.hardware.camera2.CameraMetadata#REQUEST_AVAILABLE_CAPABILITIES_RAW -
android.hardware.camera2.CaptureRequest#CONTROL_POST_RAW_SENSITIVITY_BOOST -
android.hardware.camera2.CaptureRequest#SENSOR_SENSITIVITY
通过: RAW 图像随着增强的增加而变暗,而 YUV 图像的亮度保持不变
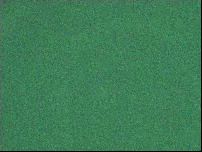
test_post_raw_sensitivity_boost_raw_s=3583_boost=0100.jpg

test_post_raw_sensitive_boost_raw_s=1792_boost=0200.jpg

test_post_raw_sensitivity_boost_raw_s=0896_boost=0400.jpg

test_post_raw_sensitive_boost_raw_s=0448_boost=0800.jpg

test_post_raw_sensitivity_boost_raw_s=0224_boost=1600.jpg

test_post_raw_sensitivity_boost_raw_s=0112_boost=3199.jpg
test_post_raw_sensitivity_boost_raw_plot_means.png

test_post_raw_sensitivity_boost_yuv_s=0112_boost=3199.jpg

test_post_raw_sensitive_boost_yuv_s=0448_boost=0800.jpg

test_post_raw_sensitivity_boost_yuv_s=0896_boost=0400.jpg

test_post_raw_sensitivity_boost_yuv_s=1792_boost=0200.jpg

test_post_raw_sensitivity_boost_yuv_s=3585_boost=0100.jpg
test_post_raw_sensitivity_boost_yuv_plot_means.png
test_raw_burst_sensitivity
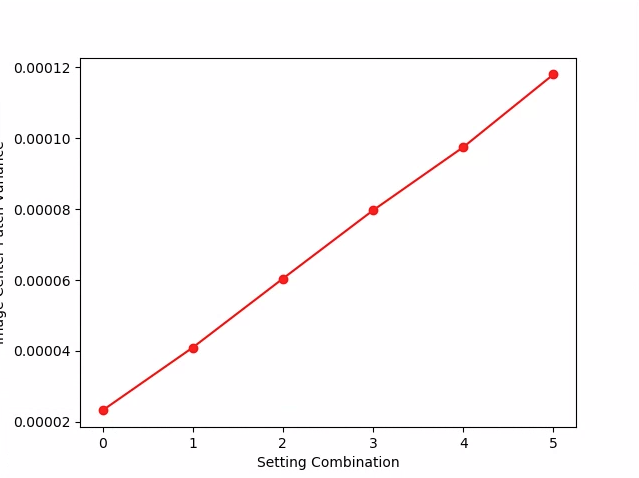
捕获一组增益增加的原始图像并测量噪声。一次只捕获原始数据。
测试的 API:
-
android.hardware.camera2.CameraCharacteristics#SENSOR_INFO_ACTIVE_ARRAY_SIZE -
android.hardware.camera2.CameraCharacteristics#SENSOR_INFO_SENSITIVITY_RANGE -
android.hardware.camera2.CameraCharacteristics#SENSOR_INFO_WHITE_LEVEL -
android.hardware.camera2.CameraCharacteristics#SENSOR_MAX_ANALOG_SENSITIVITY -
android.hardware.camera2.CameraMetadata#REQUEST_AVAILABLE_CAPABILITIES_RAW
传球:随着增益的增加,每一次射击都比前一次更嘈杂。
使用中心统计网格单元格的方差。
test_raw_burst_sensitivity_variance.png
test_raw_exposure
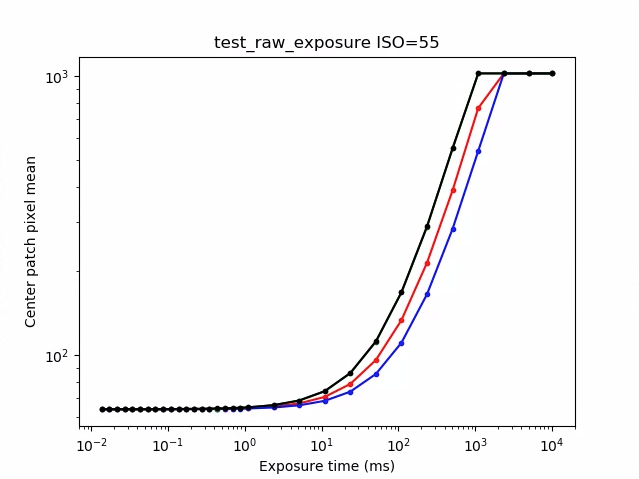
捕获一组增加曝光时间的原始图像并测量像素值。
测试的 API:
-
android.hardware.camera2.CameraMetadata#REQUEST_AVAILABLE_CAPABILITIES_RAW -
android.hardware.camera2.CaptureRequest#SENSOR_EXPOSURE_TIME
通过:增加 ISO(增益)使像素对光更敏感,因此绘图向左移动。
test_raw_exposure_s=55.png
(10⁰ 是 1 毫秒,10¹ 是 10 毫秒,10⁻¹ 是 0.1 毫秒)
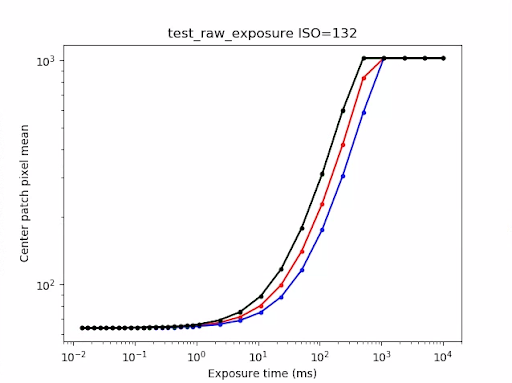
test_raw_exposure_s=132.png
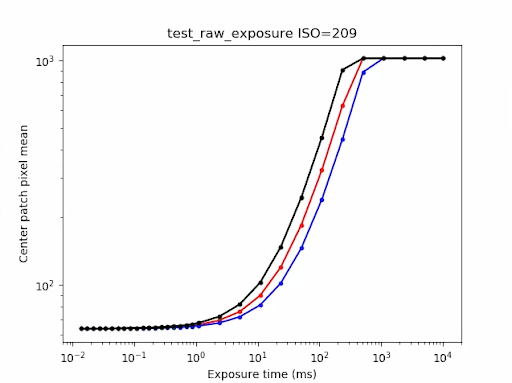
test_raw_exposure_s=209.png
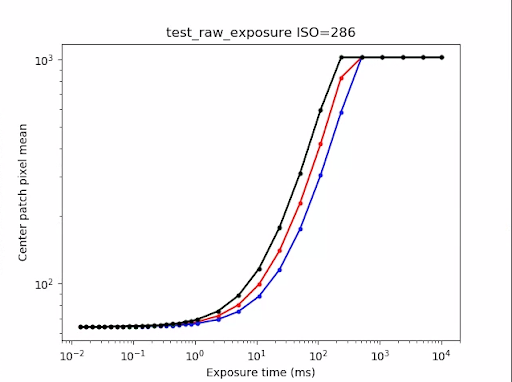
test_raw_exposure_s=286.png
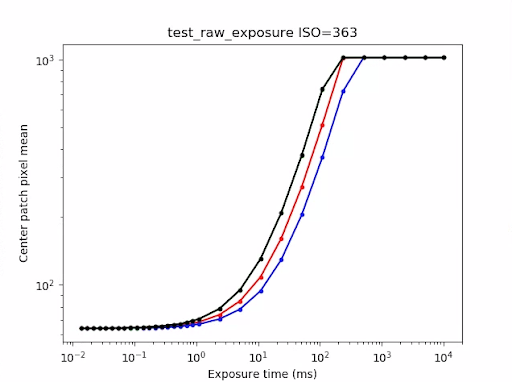
test_raw_exposure_s=363.png
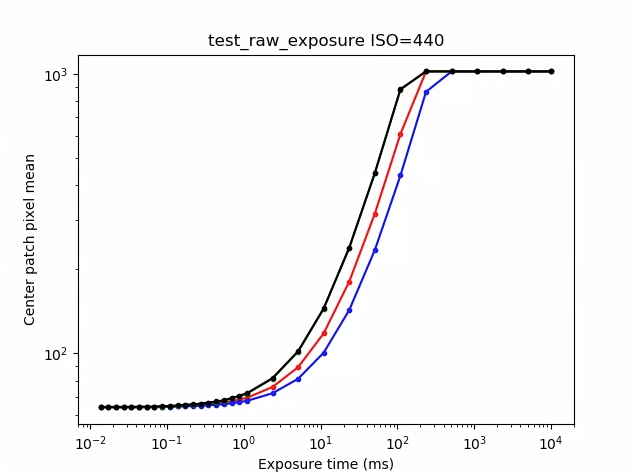
test_raw_exposure_s=440.png
test_raw_sensitivity
捕获一组灵敏度提高的原始图像,并测量图像中心 10% 的噪声(方差)。测试每个镜头是否比前一个镜头更嘈杂。
测试的 API:
-
android.hardware.camera2.CameraCharacteristics#SENSOR_INFO_PRE_CORRECTION_ACTIVE_ARRAY_SIZE -
android.hardware.camera2.CameraCharacteristics#SENSOR_INFO_SENSITIVITY_RANGE -
android.hardware.camera2.CameraCharacteristics#SENSOR_INFO_WHITE_LEVEL -
android.hardware.camera2.CameraCharacteristics#SENSOR_MAX_ANALOG_SENSITIVITY -
android.hardware.camera2.CameraMetadata#REQUEST_AVAILABLE_CAPABILITIES_RAW
传球:每次击球时差异都会增加。
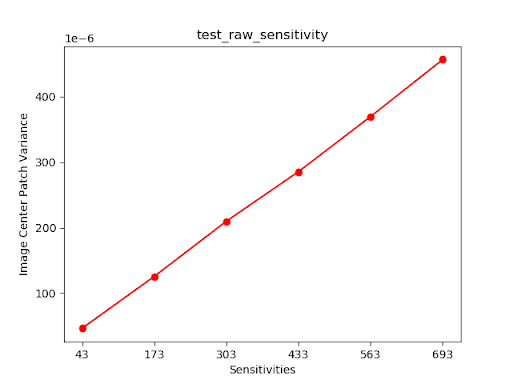
test_raw_sensitivity_variance.png
test_reprocess_noise_reduction
测试android.noiseReduction.mode是否应用于重新处理请求。在相机昏暗的情况下捕获重新处理的图像。使用高模拟增益来确保捕获的图像有噪声。捕获三个重新处理的图像,用于 NR 关闭、“快速”和“高质量”。以低增益和关闭 NR 捕获重新处理的图像,并将其方差用作基线。
测试的 API:
通过: FAST >= OFF,HQ >= FAST,HQ >> OFF
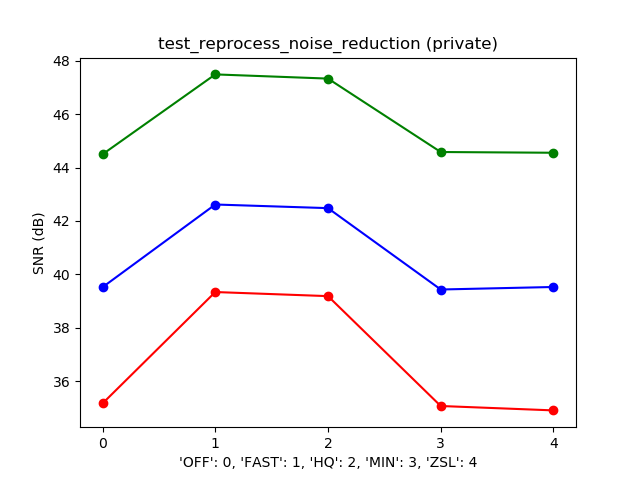
典型 SNR 与 NR_MODE 图
test_tonemap_sequence
使用不同的色调映射曲线测试一系列镜头。使用线性色调图捕获 3 次手动拍摄。使用默认色调映射捕获 3 次手动拍摄。计算每个连续帧对之间的增量。
测试的 API:
Pass:有 3 个相同的帧,后面跟着一组不同的 3 个相同的帧。
test_tonemap_sequence_i=0.jpg
test_tonemap_sequence_i=1.jpg
test_tonemap_sequence_i=2.jpg
test_tonemap_sequence_i=3.jpg
test_tonemap_sequence_i=4.jpg
test_tonemap_sequence_i=5.jpg
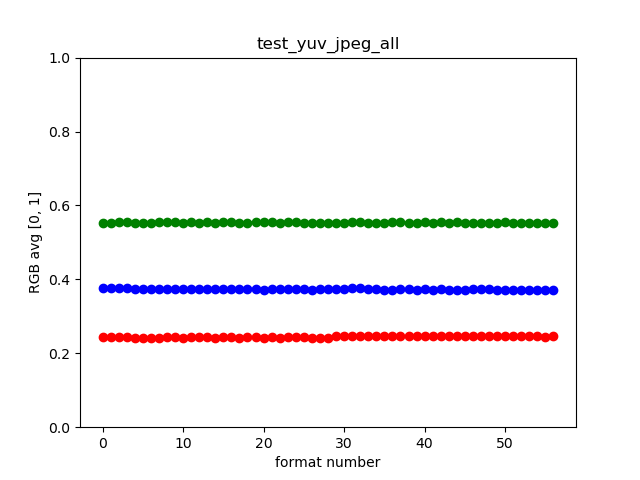
test_yuv_jpeg_all
测试所有报告的图像捕获大小和格式。使用带有线性色调图的手动请求,以便 YUV 和 JPEG 在由 its.image 模块转换时看起来相同。默认情况下不保存图像,但可以通过启用debug_mode来保存。
测试的 API:
-
android.hardware.camera2.CaptureRequest#TONEMAP_CURVE -
android.hardware.camera2.CaptureRequest#TONEMAP_MODE -
android.graphics.ImageFormat#JPEG
通过:所有图像中心在 RGB 转换图像中具有最大 RMS(信号的均方根值)差异,具有 3% 的最高分辨率 YUV 图像。
test_yuv_jpeg_all.png
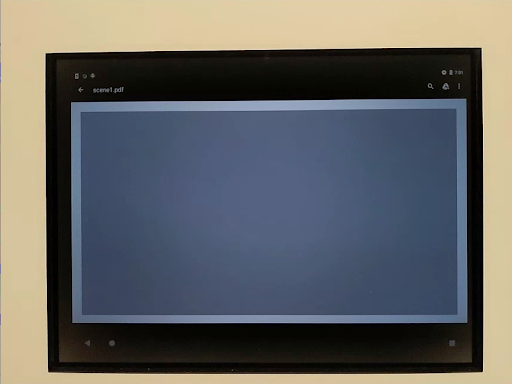
test_yuv_plus_dng
测试报告的图像捕获大小和格式是否有效。
测试的 API:
通过:测试完成并返回请求的图像。
test_yuv_plus_dng.jpg
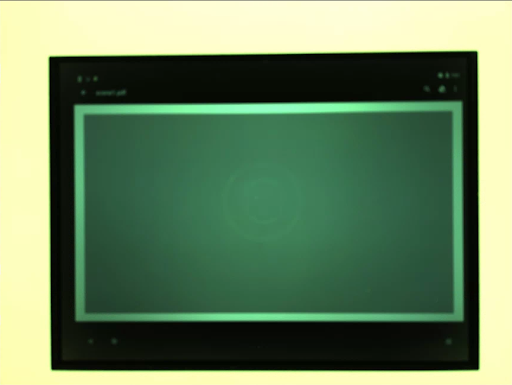
test_yuv_plus_jpeg
测试捕获单个帧作为 YUV 和 JPEG 输出。使用带有线性色调图的手动请求,以便 YUV 和 JPEG 看起来相同(当由its.image模块转换时。)
测试的 API:
-
android.hardware.camera2.CaptureRequest#TONEMAP_CURVE -
android.hardware.camera2.CaptureRequest#TONEMAP_MODE -
android.graphics.ImageFormat#JPEG
通过: YUV 和 JPEG 图像相似,并且具有小于 1% RMS(信号的均方根值)的差异。
 |  | |
| test_yuv_plus_jpg_jpg.jpg | test_yuv_plus_jpeg_yuv.jpg |
test_yuv_plus_raw
测试捕获单个帧作为 RAW 和 YUV 输出。使用带有线性色调映射的手动请求,因此 RAW 和 YUV 应该是相同的。比较 RGB 转换图像的中心 10% RGB 值。记录android.shading.mode 。
测试的 API:
-
android.hardware.camera2.CameraMetadata#REQUEST_AVAILABLE_CAPABILITIES_RAW -
android.hardware.camera2.CaptureRequest#COLOR_CORRECTION_MODE -
android.hardware.camera2.CaptureRequest#COLOR_CORRECTION_GAINS -
android.hardware.camera2.CaptureRequest#COLOR_CORRECTION_TRANSFORM -
android.hardware.camera2.CaptureRequest#CONTROL_AWB_MODE -
android.hardware.camera2.CaptureRequest#CONTROL_MODE -
android.hardware.camera2.CaptureRequest#SHADING_MODE -
android.hardware.camera2.CaptureRequest#TONEMAP_CURVE -
android.hardware.camera2.CaptureRequest#TONEMAP_MODE
通过: YUV 和 JPEG 图像相似并且具有小于 3.5% RMS(信号的均方根值)的差异。
 |  | |
| test_yuv_plus_raw_shading=1_raw.jpg | test_yuv_plus_raw_shading=1_yuv.jpg |
test_yuv_plus_raw10
测试捕获单个帧作为 RAW10 和 YUV 输出。使用带有线性色调映射的手动请求,因此 RAW 和 YUV 应该是相同的。比较 RGB 转换图像的中心 10% RGB 值。记录android.shading.mode 。
测试的 API:
-
android.hardware.camera2.CameraMetadata#REQUEST_AVAILABLE_CAPABILITIES_RAW -
android.hardware.camera2.CaptureRequest#COLOR_CORRECTION_MODE -
android.hardware.camera2.CaptureRequest#COLOR_CORRECTION_GAINS -
android.hardware.camera2.CaptureRequest#COLOR_CORRECTION_TRANSFORM -
android.hardware.camera2.CaptureRequest#CONTROL_AWB_MODE -
android.hardware.camera2.CaptureRequest#CONTROL_MODE -
android.hardware.camera2.CaptureRequest#SHADING_MODE -
android.hardware.camera2.CaptureRequest#TONEMAP_CURVE -
android.hardware.camera2.CaptureRequest#TONEMAP_MODE -
android.hardware.graphics.ImageFormat#RAW10
通过: RAW10 和 YUV 图像相似,并且具有小于 3.5% RMS(信号的均方根值)的差异。
 |  | |
| test_yuv_plus_raw10_shading=1_raw.jpg | test_yuv_plus_raw10_shading=1_yuv.jpg |
test_yuv_plus_raw12
测试捕获单个帧作为 RAW12 和 YUV 输出。使用带有线性色调映射的手动请求,因此 RAW 和 YUV 应该是相同的。比较 RGB 转换图像的中心 10% RGB 值。记录android.shading.mode 。
测试的 API:
-
android.hardware.camera2.CameraMetadata#REQUEST_AVAILABLE_CAPABILITIES_RAW -
android.hardware.camera2.CaptureRequest#COLOR_CORRECTION_MODE -
android.hardware.camera2.CaptureRequest#COLOR_CORRECTION_GAINS -
android.hardware.camera2.CaptureRequest#COLOR_CORRECTION_TRANSFORM -
android.hardware.camera2.CaptureRequest#CONTROL_AWB_MODE -
android.hardware.camera2.CaptureRequest#CONTROL_MODE -
android.hardware.camera2.CaptureRequest#SHADING_MODE -
android.hardware.camera2.CaptureRequest#TONEMAP_CURVE -
android.hardware.camera2.CaptureRequest#TONEMAP_MODE -
android.hardware.graphics.ImageFormat#RAW12
通过: RAW12 和 YUV 图像相似,并且具有小于 3.5% RMS(信号的均方根值)的差异。
 |  | |
| test_yuv_plus_raw12_shading=1_raw.jpg | test_yuv_plus_raw12_shading=1_yuv.jpg |
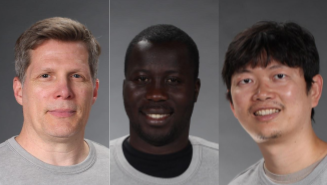
场景2_a
scene2_a 有三个灰色背景和中性服装的面孔。选择面部以具有广泛的肤色。
场景2_a
测试效果
捕获支持的相机效果的帧并检查它们是否正确生成。该测试仅检查效果OFF和MONO ,但会保存所有支持效果的图像。
测试的 API:
-
android.hardware.camera2.CameraCharacteristics#CONTROL_AVAILABLE_EFFECTS -
android.hardware.camera2.CaptureRequest#CONTROL_EFFECT_MODE
Pass:捕获效果OFF的场景图像和效果设置为MONO的单色图像。
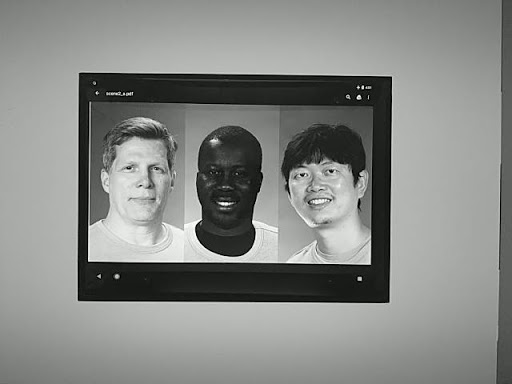
test_effects_MONO.jpg
test_faces
测试人脸检测。图像被保存,但盒子和地标信息在test_faces_stdout.txt中列出。
测试的 API:
-
android.hardware.camera2.CaptureResult#STATISTICS_FACES -
android.hardware.camera2.CaptureResult#STATISTICS_FACE_DETECT_MODE
Pass:从图像中检测到至少一张人脸。
test_format_combos
测试输出格式的不同组合。
测试的 API:
android.hardware.camera2.CameraCharacteristics#SCALER_STREAM_CONFIGURATION_MAPandroid.hardware.camera2.params.StreamConfigurationMap#getOutputSizes()android.hardware.camera2.CameraCaptureSession#captureBurst()
通过:成功捕获所有组合。
test_jpeg_quality
测试相机 JPEG 压缩质量。通过android.jpeg.quality步进 JPEG 质量并确保量化表正确更改。
测试的 API:
Pass:量化矩阵随着质量的增加而减小。 (矩阵表示除法因子。)
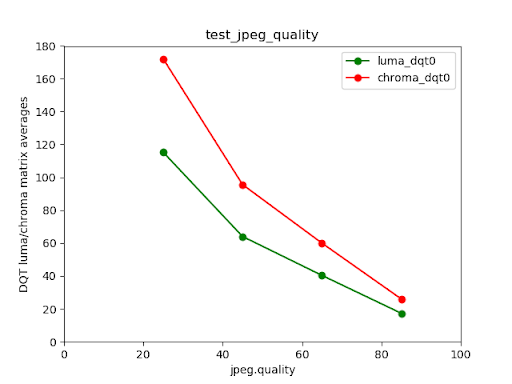
Pixel 4 后置摄像头亮度/色度 DQT 矩阵平均值与 JPEG 质量
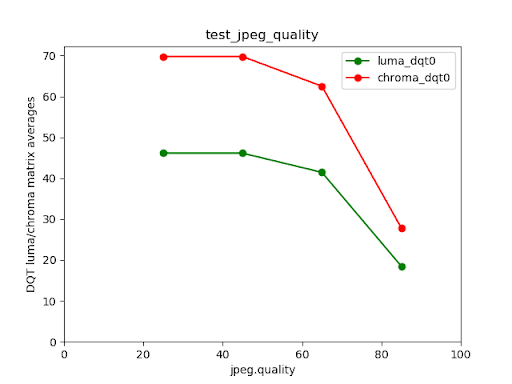
失败的测试示例
请注意,对于质量非常低的图像(jpeg.quality < 50),量化矩阵中的压缩不会增加。
test_num_faces
测试人脸检测。
测试的 API:
-
android.hardware.camera2.CaptureResult#STATISTICS_FACES -
android.hardware.camera2.CaptureResult#STATISTICS_FACE_DETECT_MODE
Pass:找到三个面。
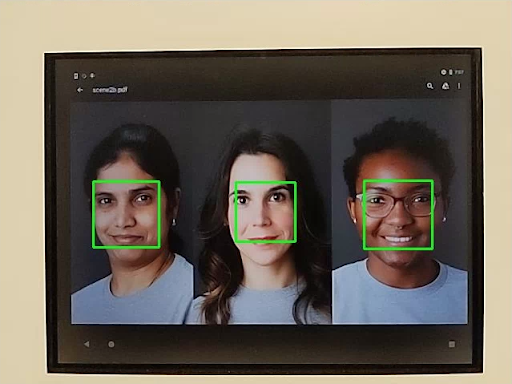
test_num_faces_fd_mode_1.jpg
场景2_b
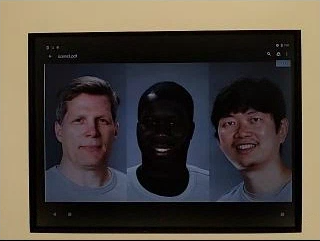
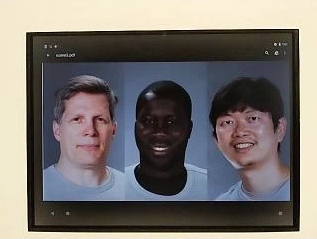
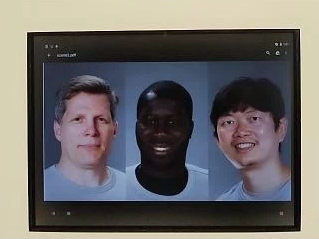
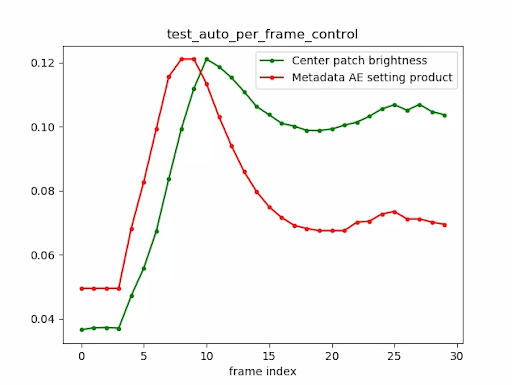
test_auto_per_frame_control
测试自动捕获请求的PER_FRAME_CONTROL属性。
测试的 API:
-
android.hardware.camera2.CaptureRequest#COLOR_CORRECTION_GAINS -
android.hardware.camera2.CaptureRequest#COLOR_CORRECTION_TRANSFORM -
android.hardware.camera2.CaptureResult#CONTROL_AE_STATE -
android.hardware.camera2.CaptureResult#CONTROL_AWB_STATE -
android.hardware.camera2.CaptureRequest#CONTROL_POST_RAW_SENSITIVITY_BOOST -
android.hardware.camera2.CaptureRequest#LENS_FOCUS_DISTANCE -
android.hardware.camera2.CaptureRequest#SENSOR_EXPOSURE_TIME -
android.hardware.camera2.CaptureRequest#SENSOR_SENSITIVITY -
android.hardware.camera2.CaptureRequest#STATISTICS_LENS_SHADING_MAP_MODE -
android.hardware.camera2.CaptureResult#STATISTICS_LENS_SHADING_CORRECTION_MAP -
android.hardware.camera2.CaptureRequest#TONEMAP_CURVE -
android.hardware.camera2.CaptureRequest#TONEMAP_MODE
通过:所有PER_FRAME_CONTROL属性都存在。
test_auto_per_frame_control_frame_1.jpg
test_auto_per_frame_control_frame_10.jpg
test_auto_per_frame_control_frame_29.jpg
test_auto_per_frame_control_plot.png
test_num_faces
测试人脸检测,增加人脸场景中的肤色多样性。
测试的 API:
-
android.hardware.camera2.CaptureResult#STATISTICS_FACES -
android.hardware.camera2.CaptureResult#STATISTICS_FACE_DETECT_MODE
通过:找到 3 个面孔。

test_num_faces_fd_mode_1.jpg
场景2_c
test_num_faces
测试人脸检测,增加人脸场景中的肤色多样性。
测试的 API:
-
android.hardware.camera2.CaptureResult#STATISTICS_FACES -
android.hardware.camera2.CaptureResult#STATISTICS_FACE_DETECT_MODE
通过:找到 3 个面孔。
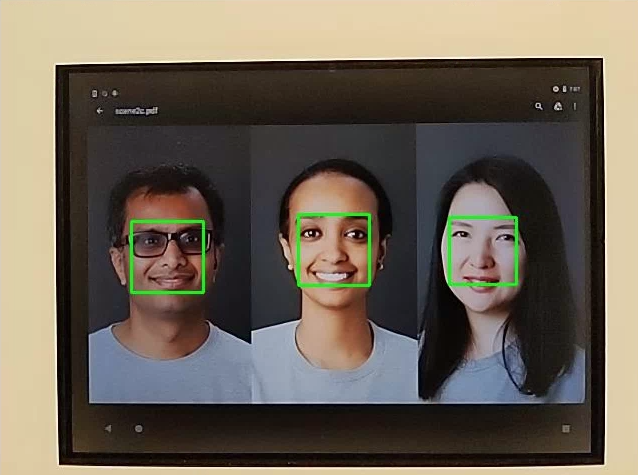
test_num_faces_fd_mode_1.jpg
test_jpeg_capture_perf_class
测试 CDD 中第 2.2.7.2 节中指定的 S 性能等级的 JPEG 捕获延迟。
通过:对于 1080p 分辨率,camera2 JPEG 捕获延迟必须小于 1000 毫秒,由 CTS 摄像机 PerformanceTest 在 ITS 照明条件 (3000K) 下对两个主摄像机进行测量。
test_camera_launch_perf_class
按照 CDD 中指定的第 2.2.7.2 节相机测试 S 性能等级的相机启动延迟。
通过:必须有 camera2 启动延迟(打开相机到第一个预览帧)< 600 毫秒,由 CTS 相机 PerformanceTest 在 ITS 照明条件 (3000K) 下为两个主相机测量。
场景2_d
test_num_faces
测试人脸检测,增加人脸场景中的肤色多样性。
测试的 API:
-
android.hardware.camera2.CaptureResult#STATISTICS_FACES -
android.hardware.camera2.CaptureResult#STATISTICS_FACE_DETECT_MODE
通过:找到 3 个面孔。
场景2_e
test_continuous_picture
使用捕获请求首先设置android.control.afMode = 4 (CONTINUOUS_PICTURE).
测试的 API:
android.hardware.camera2.CaptureRequest#CONTROL_CAPTURE_INTENTandroid.hardware.camera2.CaptureResult#CONTROL_POST_RAW_SENSITIVITY_BOOST
通过: 3A 系统在 50 帧捕获结束时稳定下来。
test_num_faces
测试人脸检测,增加人脸场景中的肤色多样性。
测试的 API:
-
android.hardware.camera2.CaptureResult#STATISTICS_FACES -
android.hardware.camera2.CaptureResult#STATISTICS_FACE_DETECT_MODE
通过:找到 3 个面孔。
场景3
Scene3 使用 ISO12233 图表,大多数测试使用图表提取器方法来查找场景中的图表。出于这个原因,大多数保存的图像没有像场景1、2或4的图像那样有边框,而只有图表。
test_3a_consistency
测试 3A 一致性。
测试的 API:
-
android.hardware.camera2.CaptureRequest#COLOR_CORRECTION_GAINS -
android.hardware.camera2.CaptureRequest#COLOR_CORRECTION_TRANSFORM -
android.hardware.camera2.CaptureRequest#LENS_FOCUS_DISTANCE -
android.hardware.camera2.CaptureResult#SENSOR_EXPOSURE_TIME -
android.hardware.camera2.CaptureResult#SENSOR_SENSITIVITY
通过: 3A 在容差范围内将曝光、增益、awb(自动白平衡)和 fd(焦距)收敛三倍。
test_edge_enhancement
测试android.edge.mode参数是否正确应用。为每个边缘模式捕获非再处理图像,并返回输出图像的清晰度和捕获结果元数据。处理具有给定边缘模式、灵敏度、曝光时间、焦距和输出表面参数的捕获请求。
通过:快速模式并不比 HQ(高质量)模式更清晰。
测试的 API:
受影响的相机参数:
-
EDGE_MODE
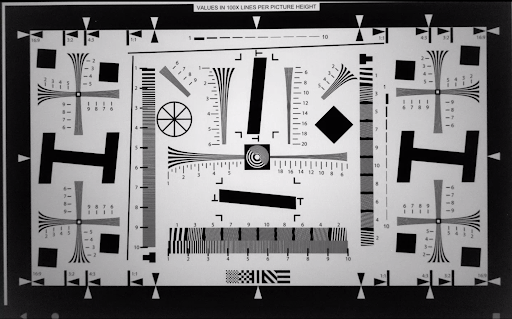
test_edge_enhancement_edge=0.jpg
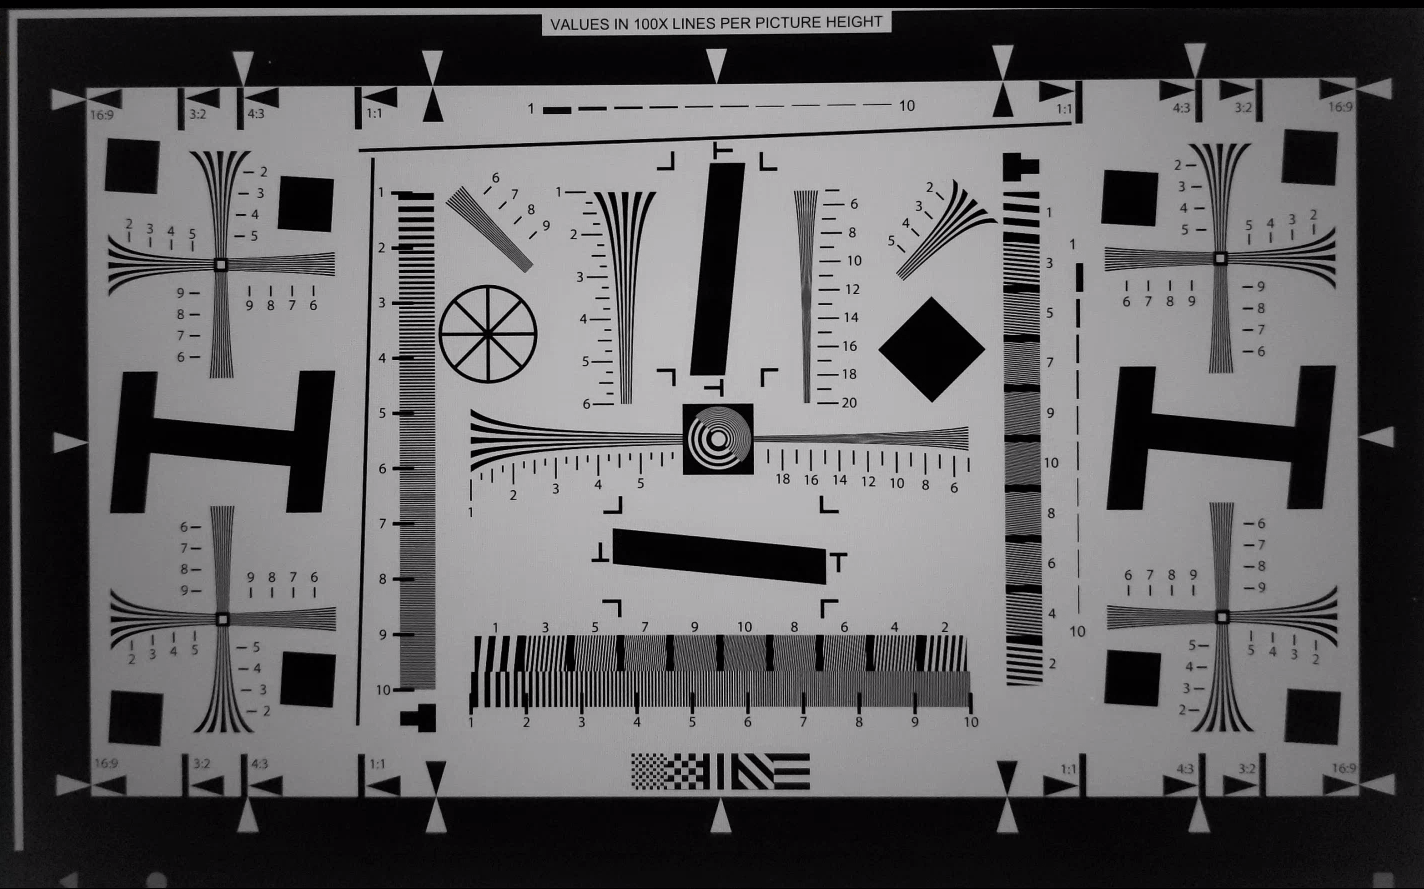
test_edge_enhancement_edge=1.jpg(快速模式)
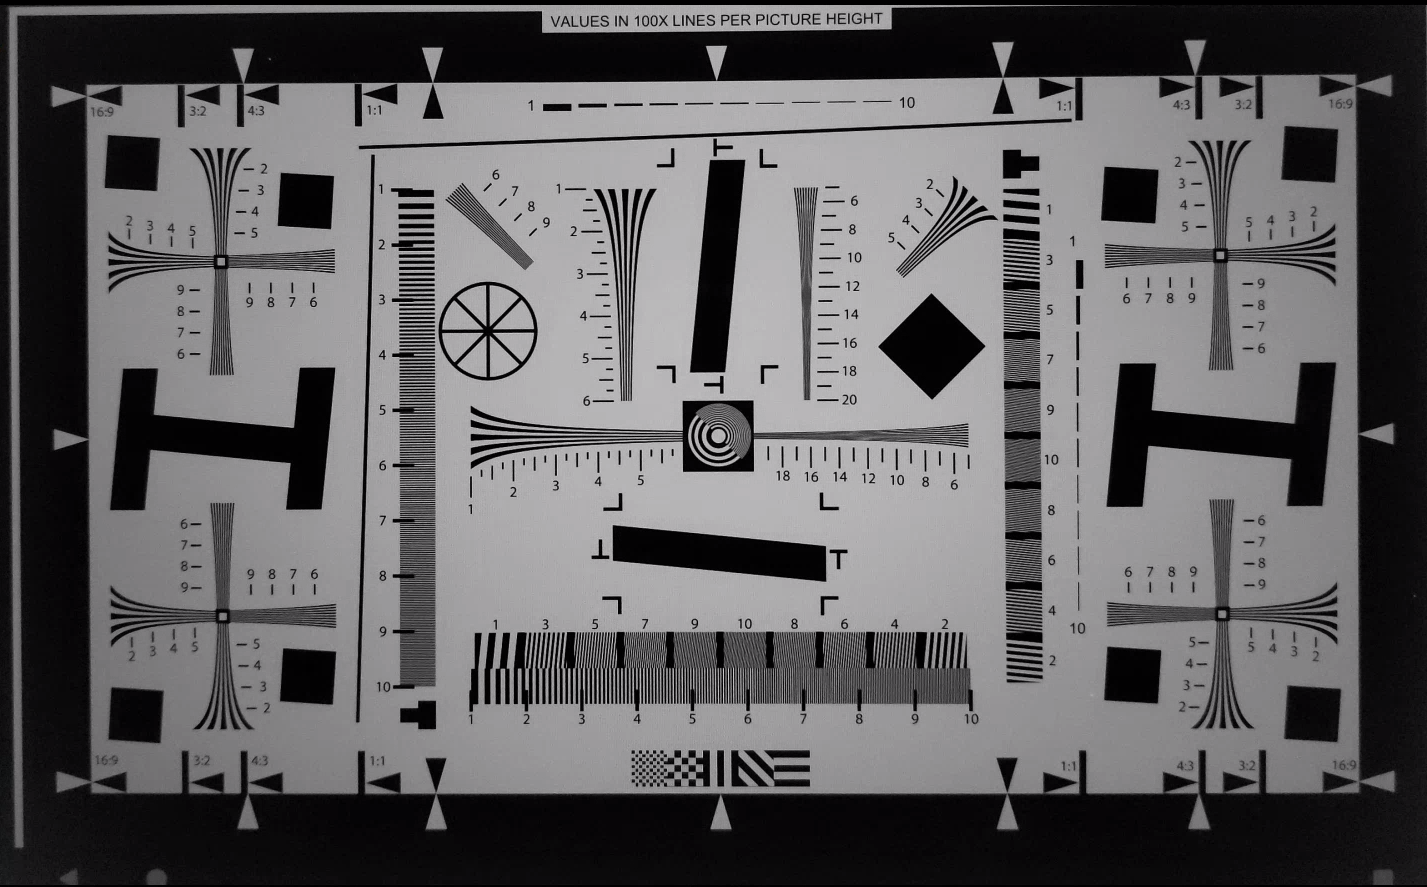
test_edge_enhancement_edge=2.jpg(高质量模式)
test_flip_mirror
根据CDD 第 7.5.2 节前置摄像头 [C-1-5]测试图像是否正确定向。
镜像、翻转或旋转的图像可以通过中心附近的菱形特征来识别。
通过:图像未翻转、镜像或旋转。
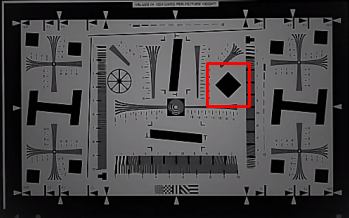
test_flip_mirror_scene_patch.jpg
test_lens_movement_reporting
测试是否正确报告了镜头移动标志。拍摄 24 张连拍图像,前 12 帧在最佳焦距处(如 3A 所示),最后 12 帧在最短焦距处。在第 12 帧附近,镜头移动导致清晰度下降。随着镜头移动到最终位置,清晰度最终会稳定下来。 The lens movement flag should be asserted in all frames where the sharpness is intermediate to sharpness in the first 10 frames with the lens stationary at optimum focal distance, and the final 10 frames where the lens is stationary in the minimum focal distance. The exact frame the lens moves isn't important: what is checked is that the movement flag is asserted when the lens is moving.
APIs tested:
-
android.hardware.camera2.CameraCharacteristics#LENS_INFO_MINIMUM_FOCUS_DISTANCE -
android.hardware.camera2.CaptureResult#LENS_STATE -
android.hardware.camera2.CaptureResult#LENS_FOCUS_DISTANCE -
android.hardware.camera2.CaptureResult#SENSOR_TIMESTAMP -
android.hardware.camera2.CaptureRequest#LENS_FOCUS_DISTANCE
Pass: Lens movement flag is True in the frame with sharpness change.
test_lens_position
Tests if the focus position is properly reported for moving lenses.
APIs tested:
-
android.hardware.camera2.CameraCharacteristics#LENS_INFO_HYPERFOCAL_DISTANCE -
android.hardware.camera2.CameraCharacteristics#LENS_INFO_MINIMUM_FOCUS_DISTANCE -
android.hardware.camera2.CaptureResult#LENS_STATE -
android.hardware.camera2.CaptureResult#SENSOR_TIMESTAMP
Pass: Correct focus positions are reported.
test_reprocess_edge_enhancement
Returns sharpness of the output images and the capture result metadata. Processes a capture request with a given edge mode, sensitivity, exposure time, focus distance, output surface parameter, and reprocess format.
APIs tested:
-
android.hardware.camera2.CaptureRequest#EDGE_MODE -
android.hardware.camera2.CaptureRequest#REPROCESS_EFFECTIVE_EXPOSURE_FACTOR
Pass: Sharpness for the different edge modes is correct.
scene4
Scene4 consists of a black circle on a white background inside a square.
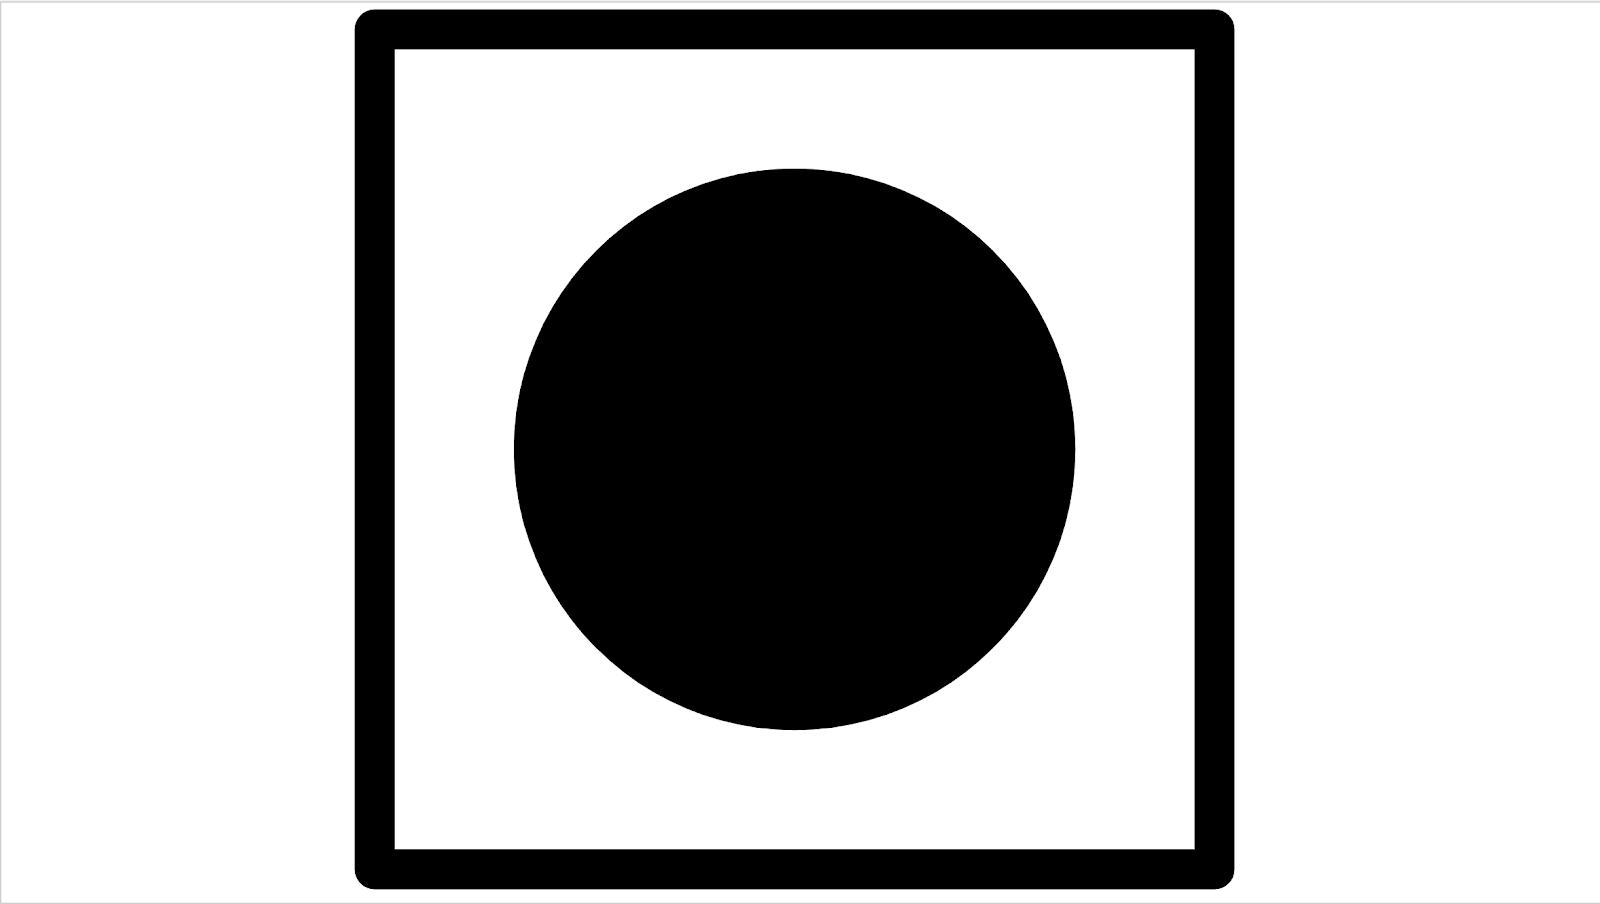
scene4
test_aspect_ratio_and_crop
Takes pictures of a circle inside of a square over all formats. Verifies that the aspect ratio of the circle doesn't change, the cropped images keep the circle in center, and the circle size doesn't change for a constant format or with different resolution (field of view check).
APIs tested:
-
android.hardware.camera2.CaptureResult#LENS_DISTORTION -
android.hardware.camera2.CaptureResult#LENS_FOCAL_LENGTH -
android.hardware.camera2.CaptureResult#LENS_INTRINSIC_CALIBRATION
Pass: Images aren't stretched, the center of images don't differ by more than 3%, and the maximum possible FOV (field of view) is preserved.
test_multi_camera_alignment
Tests the multi camera system parameters related to camera spacing. Using the multi-camera physical sub-cameras, takes a picture with one of the physical cameras. Finds the circle center. Projects the circle center to the world coordinates for each camera. Compares the difference between the cameras' circle centers in world coordinates. Reprojects the world coordinate back to pixel coordinates and compares against originals as a validity check. Compares the circle sizes checking if the focal lengths of the cameras are different.
APIs tested:
-
android.hardware.camera2.CameraCharacteristics#getPhysicalCameraIds() -
android.hardware.camera2.CameraCharacteristics#LENS_DISTORTION -
android.hardware.camera2.CameraCharacteristics#LENS_INTRINSIC_CALIBRATION -
android.hardware.camera2.CameraCharacteristics#LENS_POSE_ROTATION -
android.hardware.camera2.CameraCharacteristics#LENS_POSE_TRANSLATION -
android.hardware.camera2.CameraMetadata#REQUEST_AVAILABLE_CAPABILITIES_LOGICAL_MULTI_CAMERA -
android.hardware.camera2.CaptureRequest#SCALER_CROP_REGION -
android.hardware.camera2.CaptureRequest#DISTORTION_CORRECTION_MODE
Pass: Focal lengths and circles sizes are consistent.
scene5/diffuser
test_lens_shading_and_color_uniformity
Tests that the lens shading correction is applied appropriately, and color of a monochrome uniform scene is evenly distributed. Performs this test on a YUV frame with auto 3A. Lens shading is evaluated based on the y channel. Measures the average y value for each sample block specified, and determines pass or fail by comparing with the center y value. The color uniformity test is evaluated in r/g and b/g space.
APIs tested:
-
android.hardware.camera2.CaptureRequest#CONTROL_AE_MODE -
android.hardware.camera2.CaptureRequest#CONTROL_AWB_MODE
Pass: At the specified radius of the image, the variance of r/g and b/g value must be less than 20% to pass the test.
scene6
Scene6 is a grid of small circles with a square in one corner to indicate orientation. The small circles are needed to test zoom function over a large range.
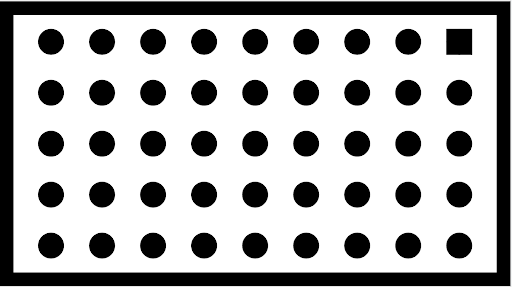
scene6
test_zoom
Tests the camera zoom behavior. Takes captures over the zoom range and checks if the circles get bigger as the camera zooms in.
APIs tested:
-
android.hardware.camera2.CameraCharacteristics#CONTROL_ZOOM_RATIO_RANGE -
android.hardware.camera2.CameraCharacteristics#LENS_INFO_AVAILABLE_FOCAL_LENGTHS -
android.hardware.camera2.CaptureRequest#CONTROL_ZOOM_RATIO -
android.hardware.camera2.CaptureResult#LENS_FOCAL_LENGTH
Pass: Relative size of captured circle is accurate against requested zoom ratio to ensure camera is zooming correctly.
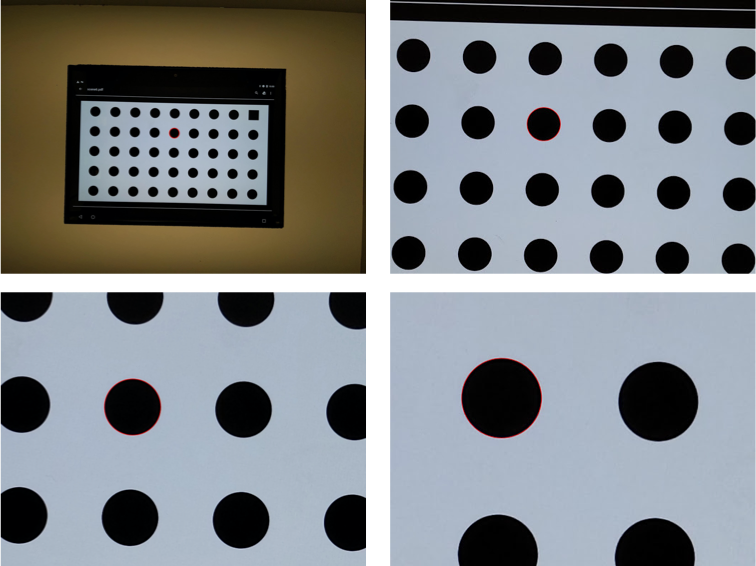
test_zoom to find the contour of the circle closest to the center.
scene_change
test_scene_change
The scene change makes use of the tablet displaying a face scene and then turns the tablet on and off to create a scene change. The scene reuses scene2_e, but is in a separate scene because of the required tablet control. Additionally, for manual testing, the scene change can be accomplished by waving your hand in front of the camera.
APIs tested:
Pass: The android.control.afSceneChange flag is asserted with a scene change.
sensor_fusion
Sensor fusion tests require specific phone movement in front of a checkerboard pattern. The sensor_fusion tests can be automated with the Sensor Fusion Box .
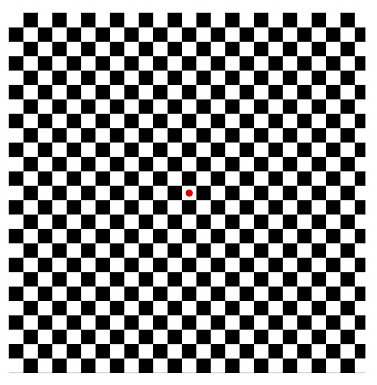
Image of checkerboard
test_multi_camera_frame_sync
Tests that frame timestamps captured by logical camera are within 10 ms by computing angles of squares within the checkerboard to determine the timestamp.
APIs tested:
-
android.hardware.camera2.CameraCharacteristics#LOGICAL_MULTI_CAMERA_SENSOR_SYNC_TYPE -
android.hardware.camera2.CameraCharacteristics#getPhysicalCameraIds() -
android.hardware.camera2.CameraMetadata#REQUEST_AVAILABLE_CAPABILITIES_LOGICAL_MULTI_CAMERA -
android.hardware.camera2.params.OutputConfiguration#setPhysicalCameraId()
Pass: Angle between images from each camera doesn't change appreciably as phone is rotated.
test_sensor_fusion
Tests the timestamp difference between the camera and the gyroscope for AR and VR applications. Phone is rotated 90 degrees 10 times in front of the checkerboard pattern. Motion is about 2 s round trip. This test is skipped if no gyroscope is included or if the REALTIME parameter is not enabled.
The test_sensor_fusion test generates a number of plots. The two most important plots for debugging are:
test_sensor_fusion_gyro_events: Shows the gyroscope events for the phone during the test. Movement in the x and y direction implies the phone isn't securely mounted on the mounting plate, reducing the probability of the test passing. The number of cycles in the plot depends on the write speed for saving frames.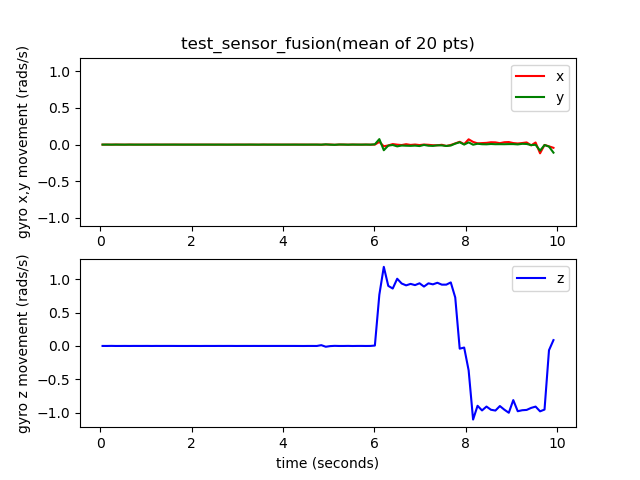
test_sensor_fusion_gyro_events
test_sensor_fusion_plot_rotations: Shows the alignment of the gyroscope and camera events. This plot must show matching movement between camera and gyroscope to +/-1 ms.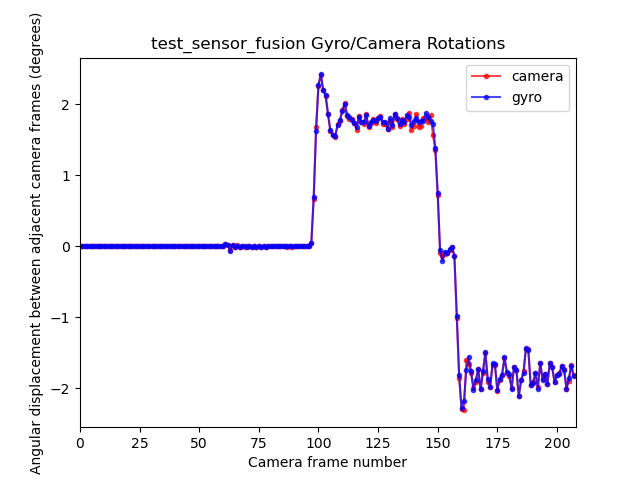
test_sensor_fusion_plot_rotations
APIs tested:
-
android.hardware.camera2.CameraCharacteristics#LENS_FACING -
android.hardware.camera2.CaptureRequest#CONTROL_AE_TARGET_FPS_RANGE -
android.hardware.camera2.CaptureRequest#SENSOR_FRAME_DURATION -
android.hardware.camera2.CaptureRequest#SENSOR_TIMESTAMP -
android.hardware.camera2.CaptureResult#SENSOR_ROLLING_SHUTTER_SKEW
Pass: Camera and gyroscope timestamps' offset is less than 1 ms as per CDD section 7.3.9 High Fidelity Sensors [C-2-14] .

