自 2025 年 3 月 27 日起,我们建议您使用 android-latest-release
而非 aosp-main
构建 AOSP 并为其做出贡献。如需了解详情,请参阅 AOSP 的变更。
VTS 信息中心设置
使用集合让一切井井有条
根据您的偏好保存内容并对其进行分类。
VTS 信息中心提供了用户后端和界面 (UI),可用于查看来自 VTS 持续集成系统的测试结果。它利用测试状态通知等工具为由测试驱动的开发提供支持,帮助开发者在开发周期中找出存在回归问题的方面并加以预防(包括测试监控和分类支持)。
VTS 信息中心的界面支持 VTS 基础架构提供的功能(如原生代码覆盖),并通过持续的性能监控,协助开发经过优化且性能卓越的工具。
要求
要使用 VTS 信息中心,您必须使用以下服务:
如需查看测试覆盖率,您需要使用一个与源代码服务器(如 Gerrit)对接的 REST API,这样网络服务就可以根据现有访问控制列表提取原始源代码。
架构
VTS 信息中心采用以下架构:
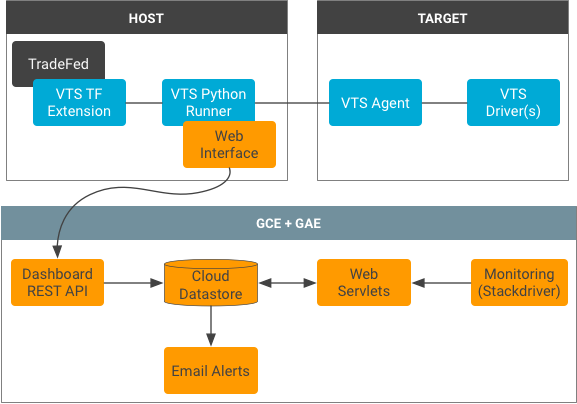
图 1. VTS 信息中心架构
测试状态结果通过 REST 接口持续上传到 Cloud Datastore 数据库。VTS 运行程序会自动处理结果并利用 Protobuf 格式将它们序列化。
网络 servlet 是用户的主要访问点,可传送和处理来自 Datastore 数据库的数据。servlet 包括:用于传送所有测试的主要 servlet;用于管理用户收藏的偏好 servlet;用于填充测试表的结果 servlet;用于准备分析数据的图表 servlet;以及用于准备客户端的覆盖率数据的覆盖率 servlet。
每个测试模块都有各自的 Datastore 祖先实体树,且测试结果会根据测试开始时间的 Unix 时间戳编入索引。数据库中的覆盖率数据会作为计数矢量(即原始源代码文件中的每一行的计数矢量)以及用于从源代码服务器提取源代码的识别信息随测试结果一起存储。
通知服务运行时会使用任务队列、识别测试用例状态变化以及向订阅者发出通知。状态信息存储在状态表中,以跟踪数据新鲜度和现有故障。这样一来,通知服务便可以提供有关各个测试用例故障和修复情况的丰富信息。
代码结构
VTS 信息中心基本组件包括在 Java 中实现的 servlet、前端 JSP、CSS 样式表和配置文件。以下列表详细介绍了这些组件的位置和说明(所有路径均为相对于 test/vts/web/dashboard
的路径):
pom.xml
定义了环境变量和依赖项的设置文件。
src/main/java/com/android/vts/api/
包含通过 REST 与数据进行交互的端点。
src/main/java/com/android/vts/entity/
包含 Datastore 实体的 Java 模型。
src/main/java/com/android/vts/proto/
包含用于 Protobuf 的 Java 文件,其中包括 VtsReportMessage.java
(用于说明 VTS 测试结果的 Protobuf 类型的 Java 实现)。
src/main/java/com/android/vts/servlet/
包含用于 servlet 的 Java 文件。
src/main/java/com/android/vts/util/
包含用于 servlet 所用实用函数和类的 Java 文件。
src/test/java/com/android/vts/
包含 servlet 和 utils 的界面测试。
src/main/webapp/
包含与界面相关的文件(JSP、CSS、XML):
js/
:包含网页使用的 JavaScript 文件。
WEB-INF/
:包含配置和界面文件。
jsp/
:包含每个网页的 JSP 文件。
appengine-web.xml
用于将环境变量加载到变量的设置文件。
web.xml
定义了 servlet 映射和安全限制的设置文件。
cron.xml
用于定义预定任务(即通知服务)的设置文件。
设置信息中心
如需设置 VTS 信息中心,请执行以下操作:
- 创建 Google Cloud App Engine 项目,然后通过安装以下各项来设置部署主机:
- Java 8
- Google App Engine SDK
- Maven
- 在 Google Cloud API Manager 中生成 OAuth 2.0 客户端 ID。
- 创建服务账号和密钥文件。
- 将电子邮件地址添加到 App Engine Email API 授权发件人列表。
- 设置 Google Analytics 账号。
- 在信息中心
pom.xml
中指定环境变量:
- 使用 OAuth 2.0 ID(在第 2 步中生成)设置客户端 ID。
- 使用密钥文件(在第 3 步中创建)中包含的标识符设置服务客户端 ID。
- 指定用于发送提醒的发件人电子邮件地址(在第 4 步中添加)。
- 指定将向其发送所有电子邮件的电子邮件域名。
- 指定 Gerrit REST 服务器的地址。
- 指定要用于 Gerrit REST 服务器的 OAuth 2.0 范围。
- 指定 Google Analytics ID(在第 5 步中设置)。
- 构建和部署项目。
- 在终端运行
mvn clean appengine:update
。
安全注意事项
如需获取全面的覆盖率信息,需要用到原始源代码。但是,部分代码可能属于敏感信息,向其添加额外的网关可能会导致现有访问控制列表遭到利用。
为了消除这种隐患,信息中心会直接处理覆盖率矢量(即执行计数的矢量;该矢量会映射到源代码文件中的相应行),而不是提供包含覆盖率信息的源代码。除了覆盖率矢量,信息中心还会接收 Git 项目名称和路径,以便客户端可以通过外部源代码 API 提取这些代码。客户端浏览器收到这些信息后,会使用 JavaScript 的跨源资源共享 (CORS) 来查询源代码服务器是否有相应的原始源代码;收到的代码会与覆盖率矢量结合使用,以便在浏览器中显示这种信息。
这种直接的方法不会扩大受攻击面,因为信息中心会利用用户的 Cookie 对外部服务进行身份验证(这意味着无权直接访问源代码的用户将无法利用信息中心来查看敏感信息)。
本页面上的内容和代码示例受内容许可部分所述许可的限制。Java 和 OpenJDK 是 Oracle 和/或其关联公司的注册商标。
最后更新时间 (UTC):2025-07-27。
[null,null,["最后更新时间 (UTC):2025-07-27。"],[],[],null,["# VTS Dashboard setup\n\nThe VTS Dashboard provides a user backend and user interface (UI) for viewing\ntest results from the VTS continuous integration system. It supports test-driven\ndevelopment with tools such as test status notifications to help developers to\nlocate and prevent regression areas during the development cycle (include test\nmonitoring and triaging support).\n\n\nThe VTS Dashboard UI supports features (such as native code coverage) provided\nby the VTS infrastructure and offers continuous performance monitoring to enable\nthe development of optimized and well-characterized performance tools.\n\nRequirements\n------------\n\n\nThe following services are required to use the VTS Dashboard:\n\n- [Apache Maven](https://maven.apache.org/), for building and deployment\n- [Google Cloud\n App Engine](https://cloud.google.com/appengine), for web-service hosting\n- [Google\n Cloud Datastore](https://cloud.google.com/datastore/docs/), for storage\n- [Google\n Stackdriver](http://www.stackdriver.com/), for monitoring\n\n\nViewing [test coverage](/docs/core/tests/vts/ui#coverage) relies on a REST API to a\nsource code server (e.g. Gerrit), which enables the web service to fetch\noriginal source code according to existing access control lists.\n\nArchitecture\n------------\n\n\nThe VTS Dashboard uses the following architecture:\n**Figure 1**. VTS Dashboard architecture.\n\n\nTest status results are continuously uploaded to the Cloud Datastore database\nvia a REST interface. The VTS runner automatically processes the results and\nserializes them using the Protobuf format.\n\n\nWeb servlets form the primary access point for users, delivering and processing\ndata from the Datastore database. The servlets include: a main servlet for\ndelivering all of the tests, a preferences servlet for managing user favorites,\na results servlet for populating a test table, a graph servlet for preparing\nprofiling data, and a coverage servlet for preparing coverage data for the\nclient.\n\n\nEach test module has its own Datastore ancestry tree and test results are\nindexed with the Unix timestamp of the test start time. Coverage data in the\ndatabase is stored with the test results as a vector of counts (i.e. for each\nline in the original source file) and identifying information to fetch the\nsource code from a source code server.\n\n\nThe notification service runs using task queues, identifying test case status\nchanges, and notifying subscribers. Stateful information is stored in a status\ntable to keep track of data freshness and existing failures. This allows for the\nnotification service to provide rich information about individual test case\nfailures and fixes.\n\nCode structure\n--------------\n\n\nVTS Dashboard essential components include the servlets implemented in Java,\nthe front-end JSPs, CSS stylesheets, and configuration files. The following list\ndetails the locations and descriptions of these components (all paths relative\nto `test/vts/web/dashboard`):\n\n- `pom.xml` \n Settings file where environment variables and dependencies are defined.\n- `src/main/java/com/android/vts/api/` \n Contains endpoints for interacting with the data via REST.\n- `src/main/java/com/android/vts/entity/` \n Contains Java models of the Datastore entities.\n- `src/main/java/com/android/vts/proto/` \n Contains Java files for Protobuf, including `VtsReportMessage.java`, which is a Java implementation of Protobuf type used to describe VTS test results.\n- `src/main/java/com/android/vts/servlet/` \n Contains Java files for servlets.\n- `src/main/java/com/android/vts/util/` \n Contains Java files for utility functions and classes used by the servlets.\n- `src/test/java/com/android/vts/` \n Contains UI tests for the servlets and utils.\n- `src/main/webapp/` \n Contains files related to the UI (JSP, CSS, XML):\n - `js/`. Contains Javascript files used by the web pages.\n - `WEB-INF/`. Contains configuration and UI files.\n - `jsp/`. Contains the JSP files for each web page.\n- `appengine-web.xml` \n Settings file where environment variables are loaded into variables.\n- `web.xml` \n Settings file where servlet mappings and security constraints are defined.\n- `cron.xml` \n Settings file defining scheduled tasks (i.e. the notifications service).\n\nSet up the Dashboard\n--------------------\n\n\nTo set up the VTS Dashboard:\n\n1. Create a Google Cloud App Engine Project and set up the deployment host by installing:\n - Java 8\n - Google App Engine SDK\n - Maven\n2. Generate an OAuth 2.0 Client ID in the Google Cloud API Manager.\n3. Create a Service Account and create a keyfile.\n4. Add an email address to the App Engine Email API Authorized Senders List.\n5. Set up a Google Analytics Account.\n6. Specify environment variables in the Dashboard `pom.xml`:\n - Set the client ID with the OAuth 2.0 ID (from step 2).\n - Set the service client ID with the identifier included in the keyfile (from step 3).\n - Specify the sender email address for alerts (from step 4).\n - Specify an email domain to which all emails will be sent.\n - Specify the address to the Gerrit REST server.\n - Specify the OAuth 2.0 scope to use for the Gerrit REST server.\n - Specify the Google Analytics ID (from step 5).\n - Build and deploy the project.\n7. In a terminal, run `mvn clean appengine:update`.\n\nSecurity considerations\n-----------------------\n\n\nRobust coverage information requires access to the original source code.\nHowever, some code may be sensitive and an additional gateway to it may allow\nfor exploitation of existing access control lists.\n\n\nTo avoid this threat, instead of serving the source code with the coverage\ninformation, the Dashboard directly handles a coverage vector (i.e., a vector of\nexecution counts mapping to lines in a source file). Along with the coverage\nvector, the Dashboard receives a Git project name and path so the client can\nfetch the code from an external source code API. The client browser receives\nthis information and uses cross-origin resource sharing (CORS) in Javascript to\nquery the source code server for the original source code; the resulting code is\ncombined with the coverage vector to produce a display.\n\n\nThis direct approach does not widen the attack surface because the Dashboard\nuses the user's cookies to authenticate with an outside service (meaning a user\nwho cannot access source code directly cannot exploit the Dashboard to view\nsensitive information)."]]